
Basement Finishing Process — Complete Guide
When you finish a basement, the difference between a smooth project and a stressful one usually comes down to knowing the sequence before work begins. This guide walks you through the full basement remodeling process from design and permits to framing, insulation, and the final walkthrough, so you know what happens at each stage and when. You will see how St. Louis homes add their own wrinkles, from clay-soil moisture to older load-bearing structures. You will also find links to deeper guides on every major subtopic, from egress windows to bathroom plumbing. By the end, you should be able to read any contractor's quote and know exactly what it does and does not include.
What You'll Find in This Guide
- Basement HVAC Heating System Guide: Ductwork, Zoning, and Comfort in St. Louis, MO
- Basement Egress Windows Requirements in Missouri: Code, Installation, and What St. Louis Homeowners Should Expect
- Load-Bearing Wall Removal vs. Reinforcement in Basement Finishing: A Step-by-Step Guide
- The Basement Finishing Process: What Each Stage Costs in St. Louis
- The Basement Finishing Process, Step by Step: What Happens and When
- Basement Humidity and Moisture Control: 8 Steps Before You Finish a St. Louis Basement
- Basement Finishing Process Terms Explained: A Plain-English Glossary
- Basement Bathroom Addition Plumbing: A Step-by-Step Guide for St. Louis Homes
Planning and Permits: Where Basement Remodeling Projects Succeed or Fail
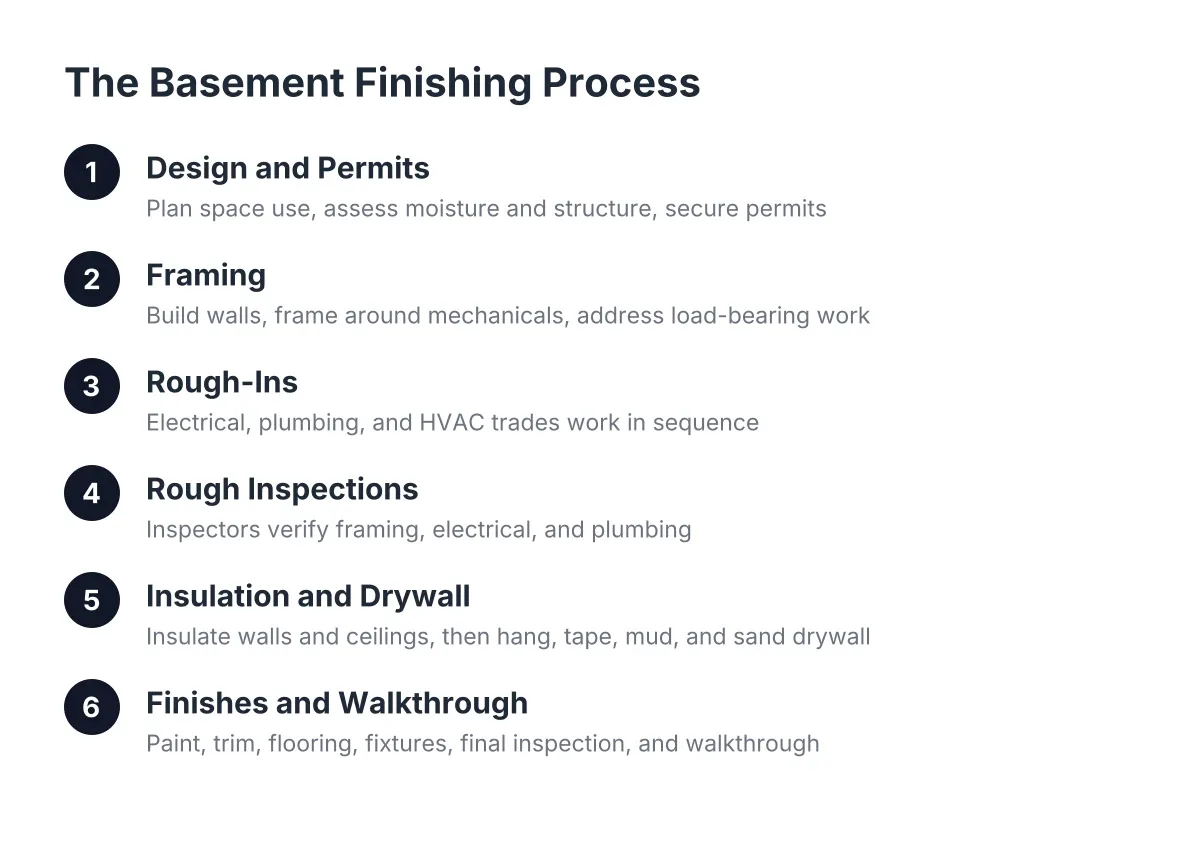
The planning phase determines almost everything that follows. Before anyone picks up a hammer, you need three things settled: a design that fits your goals, a permit path that fits your municipality, and a dry basement that can actually hold a finished room.
Start with how you want to use the space. A media room, a bar, a guest suite, and a home gym all place different demands on layout, lighting, plumbing, and heating. For example, adding a bedroom triggers egress requirements that a rec room does not. That single decision can change your window plan, your budget, and your permit review. Our guide to Missouri basement egress window requirements covers what inspectors expect, so read it before you lock in a floor plan.
Next comes the permit itself. Every St. Louis area municipality requires permits for basement finishing that adds electrical circuits, plumbing, or new walls. However, the review process varies by jurisdiction, and timelines can run from a few days to several weeks. A basement-first contractor pulls these permits routinely and knows which inspectors review what. That familiarity matters more than most homeowners realize. Skipped permits surface later during home sales, and unpermitted work can force you to open finished walls for inspection.
Moisture Comes Before Everything Else
Finally, address moisture before you finish anything. St. Louis basements sit in clay soil and take on vapor through concrete walls all year. As a result, finishing over an unresolved moisture problem is the most expensive mistake in basement remodeling. Mold behind new drywall does not announce itself until the damage is done. The EPA's guide on mold and moisture explains why controlling humidity matters for indoor air quality. For the practical version, our eight moisture control steps before finishing walks through the specific checks to complete before framing begins.
Budget two to four weeks for this phase on a typical project. It feels slow when you want to see walls go up. In practice, it is the cheapest time to catch problems, because changes on paper cost nothing compared to changes mid-build.
The Build Sequence: Framing, Mechanicals, Insulation, and Finishes
Once permits clear, the physical work follows a strict order. Each trade depends on the one before it, and skipping ahead creates rework. Understanding this sequence helps you track progress and spot trouble early.
Framing comes first. Crews lay out walls, build soffits around ductwork and beams, and frame door openings. This is also when structural questions get resolved. Most St. Louis basements hide at least one wall or post carrying the weight of the house above. Consequently, you face a real decision: work around that structure or change it. Our step-by-step guide to load-bearing wall removal vs. reinforcement lays out what each path involves and what it costs.
Rough-Ins: The Work You Will Never See Again
After framing, the mechanical trades move in. Electricians run wiring for outlets, lighting, and any media or bar circuits. Plumbers rough in supply and drain lines if you are adding a bathroom or wet bar. Because basements sit below the main drain line, this work often involves breaking concrete or installing an ejector pit. It is also the stage where corners get cut most often, which is why our guide to basement bathroom rough-in plumbing is worth reading before you approve a bid.
Heating belongs in this phase too, not as an afterthought. A finished basement that stays cold half the year is a room your family stops using by Thanksgiving. With this in mind, review basement HVAC ductwork and zoning options early, because extending ducts or adding a zone is far easier before drywall goes up.
Inspections, Insulation, and the Finish Line
Rough-in inspections follow. Inspectors verify the electrical, plumbing, and framing work before anything gets covered. Only then does insulation go in, followed by drywall, paint, trim, doors, and flooring. Flooring choice matters more below grade than above it, since concrete slabs transmit cold and moisture. A plywood subfloor often makes the difference between carpet that feels warm and carpet that feels damp. Final inspection and your walkthrough close out the project.
Timeline, Costs, and How to Compare Basement Remodeling Quotes
Most homeowners ask two questions before anything else: how long will this take, and what will it cost. Both have honest answers, even though many contractors avoid giving them.
On timeline, a straightforward finish with no bathroom typically runs six to ten weeks of active work. Adding a bathroom or bar extends that, because plumbing rough-ins, concrete work, and extra inspections add steps. Permit review adds time up front, and material lead times can stretch things further. That said, the biggest schedule killers are decisions made late. For instance, changing a flooring choice after drywall or moving a wall after electrical rough-in forces trades to come back and redo work. If you want the full sequence with what happens at each phase, our step-by-step walkthrough of the basement finishing process maps the whole project from contract signing to move-in day.
Why Two Identical Basements Get Very Different Quotes
On cost, three factors drive quotes apart more than anything else: square footage, whether you are adding plumbing, and the condition of the space before work starts. Two St. Louis homeowners with the same footprint can receive bids thousands of dollars apart for legitimate reasons. One basement might need moisture remediation, a new subfloor, and an ejector pit. The other might need none of those. Our breakdown of what each stage costs in St. Louis shows where the money actually goes, phase by phase.
Comparing quotes is where clarity pays off. Unfortunately, many bids bury the details in jargon: rough-in, flush beam, vapor barrier, dedicated circuit. If two quotes differ by $8,000, the difference usually hides in those line items, not in the price of paint. To read bids with confidence, keep our plain-English glossary of basement finishing terms open while you review them. It helps you ask sharper questions and spot what a low bid quietly leaves out.
One more comparison point: ask each contractor how much of their work is basements. A company that finishes basements every week handles below-grade plumbing, moisture, and egress issues as routine. By contrast, a generalist who treats basement remodeling as an add-on line item learns those lessons on your project.
Ready to Get Started?
You now have the full map: planning and permits, the build sequence, and how to judge timelines and quotes. If you are ready to turn your unfinished St. Louis basement into a bar, a bathroom, or a livable lower level, reach out for a walkthrough and a quote with real numbers attached. We only do basements, so you get straight answers on price and process from the first conversation.