Waterproof Flooring for Basement Spaces: Epoxy, Vinyl, and Hybrid Systems Explained
If you are finishing a basement in St. Louis, waterproof flooring for basement spaces is not one product decision. It is a system decision. The concrete slab under your feet behaves nothing like the plywood subfloor upstairs, and most of the flooring advice online was written for above-grade rooms. This guide walks through the three approaches that actually hold up over a basement slab, epoxy coatings, waterproof vinyl plank, and hybrid subfloor-plus-flooring systems, and shows you how to install or evaluate each one so a future moisture event does not undo the work.
Why a Basement Slab Changes the Flooring Decision
Concrete looks solid, but it moves moisture constantly. Ground water below the slab pushes vapor upward through the concrete, and in older St. Louis homes there may be no vapor barrier under the slab at all. A vapor barrier placed over the base course under a concrete slab is meant to block moisture transmission from the ground into the concrete above, according to W. R. Meadows. Many homes built decades ago never got one.
That matters because any flooring you put down becomes the new lid on that vapor. Trap it under the wrong material and you get cupped boards, peeling adhesive, musty odor, or mold under the finished floor. This is why solid hardwood and standard laminate fail so often below grade, and why the whole conversation about waterproof flooring for basement projects starts under the floor, not with the plank you pick at the store.
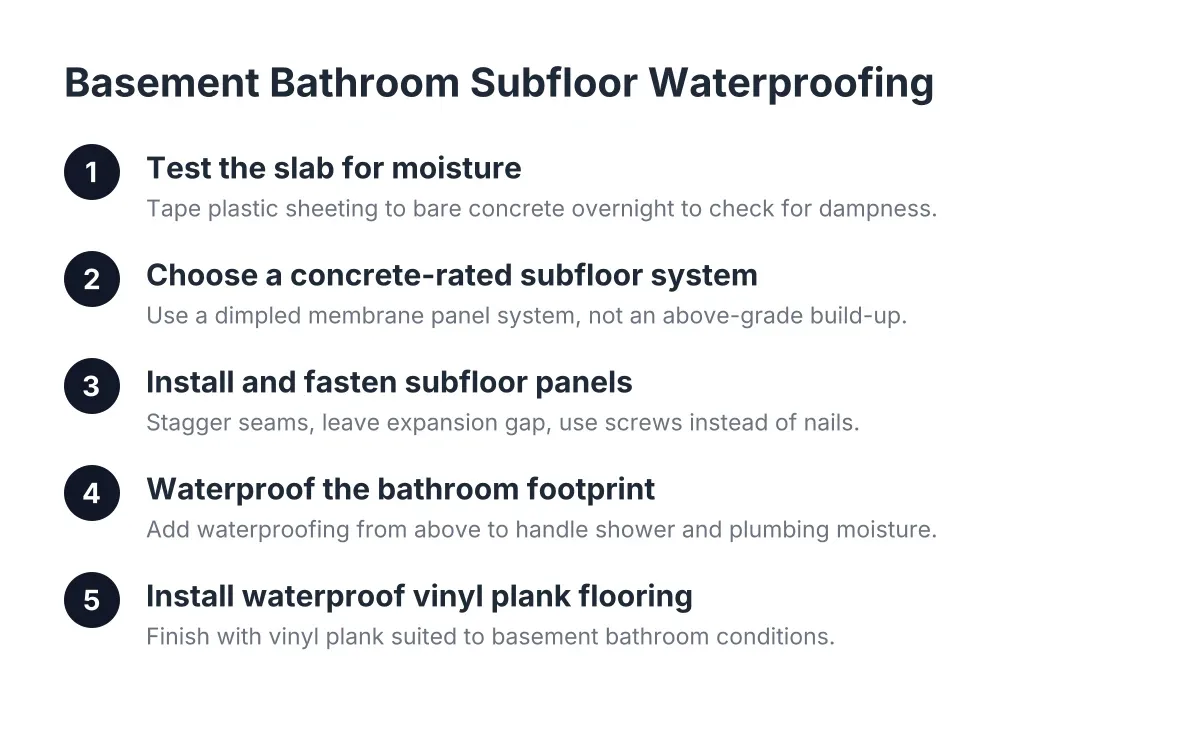
Before you choose anything, do a simple check. Tape a two-foot square of clear plastic sheeting to the slab, seal all four edges, and leave it for 48 to 72 hours. Condensation or a dark spot under the plastic means the slab is transmitting moisture, and your flooring plan needs to account for it. Even a dry test result does not mean the slab will stay dry through a wet St. Louis spring; it just tells you your starting point.
The Three Waterproof Flooring Systems That Work Below Grade
Every basement flooring approach that survives long-term falls into one of three categories. Each handles moisture differently, and each fits a different kind of basement and budget.
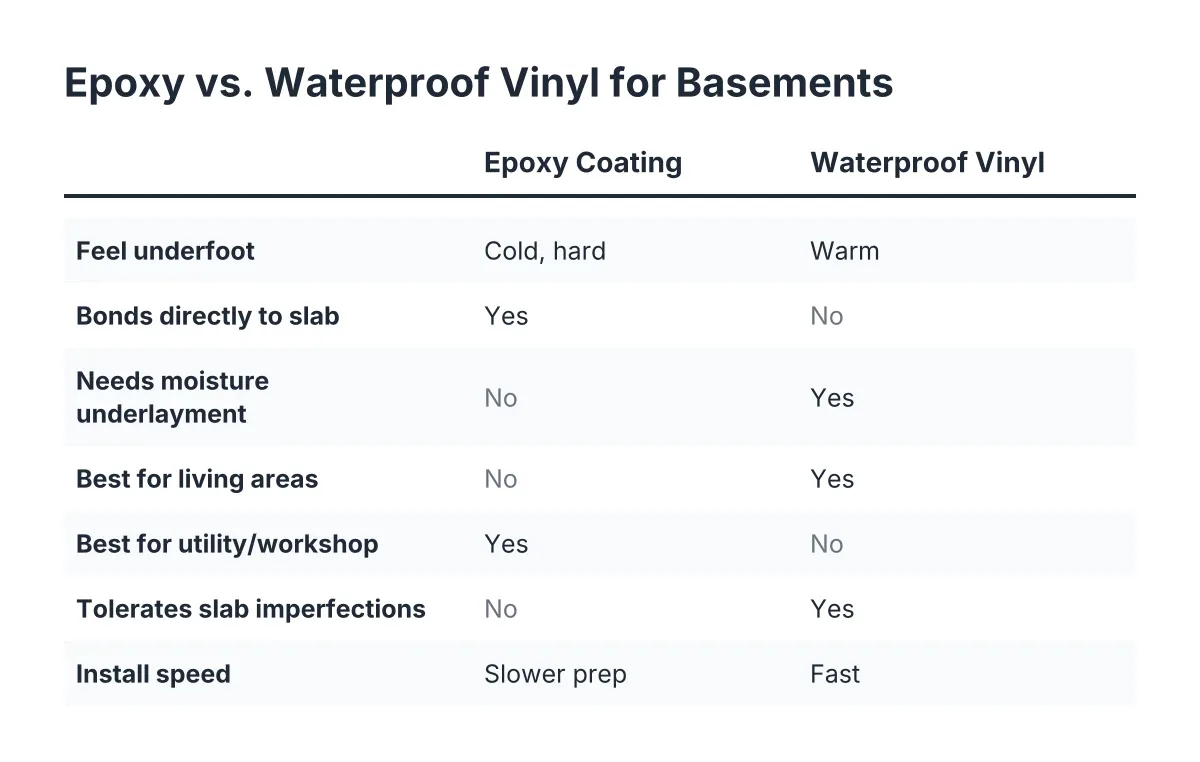
- Epoxy or coating systems. The concrete itself becomes the finished floor. Moisture-tolerant, hard, and easy to clean, but cold and loud underfoot.
- Waterproof vinyl plank installed close to the slab. Luxury vinyl plank (LVP) over a moisture-protective underlayment, floating directly on the concrete. Warmer looking, fast to install, and the plank itself does not absorb water.
- Hybrid systems: a raised subfloor plus finished flooring. A dimpled-membrane subfloor panel or rigid insulation layer creates an air gap and thermal break above the slab, with LVP, carpet, or another finish on top. The most livable result, and the most protective in a moisture-prone basement.
The rest of this guide takes each one in order, then covers the installation details that decide whether the system actually performs.
Epoxy Floor Coatings: When Bare Concrete Is the Right Answer
An epoxy floor basement approach makes sense when you want the space usable and moisture-proof without building a floor assembly at all. Epoxy bonds directly to the concrete, so there is nothing to trap vapor between layers, nothing to rot, and nothing to tear out if the basement ever takes on water. For a workshop, laundry area, or utility room, it is hard to beat.
Preparation decides everything with epoxy. The slab must be clean, sound, and mechanically profiled, usually by grinding, so the coating can bite. Any curing compound, old paint, or sealer left behind becomes a failure point. Moisture matters here too; a slab with heavy vapor drive can push a standard epoxy off the concrete in sheets, so moisture-tolerant primers or a vapor-mitigating base coat are the right call on a slab that failed the plastic-sheet test.
Epoxy also earns its keep in a supporting role. Coating the floor of an unfinished utility or mechanical room after construction helps contain concrete dust so it does not migrate into the finished living space every time someone opens the door. Plenty of finished basements pair carpeted or vinyl living areas with an epoxied mechanical room for exactly this reason.
The trade-offs are comfort and feel. Epoxy is cold, hard, and reflective of sound. It reads as garage, not living room. If the plan includes a basement bar, a bedroom, or a family room, most homeowners want something warmer underfoot, which brings us to vinyl.
Waterproof Vinyl Flooring for Basement Living Areas
Waterproof vinyl flooring for basement living space is the default recommendation for a reason. Luxury vinyl plank resists humidity and standing moisture, and it does not cup, bow, or buckle the way solid or engineered wood can when basement humidity swings through a Missouri summer. It floats over the slab, so it also tolerates the minor slab imperfections common in older homes.
Is vinyl plank flooring good for a basement on its own, though? Only if you respect one rule: a dedicated moisture-protective underlayment over the concrete is mandatory, even when the planks come with a pre-attached pad. The attached pad is for sound and comfort, not vapor control. Skipping the separate moisture barrier is the single most common DIY mistake with LVP over concrete, and it is invisible until the smell shows up.
The installation sequence over a bare slab looks like this:
- Test the slab for moisture and let any new concrete or patching cure fully.
- Grind or fill high and low spots; floating floors telegraph slab humps and rock over dips.
- Roll out a moisture-protective underlayment rated for below-grade concrete, taping seams per the manufacturer.
- Float the LVP with the required expansion gap at every wall and post.
- Cover the gap with base trim fastened to the wall, never through the flooring.
Cost is where vinyl surprises people in a good direction. Vinyl plank flooring for basement projects generally lands well below tile or engineered wood on a per-square-foot basis, though the exact number depends on plank quality, wear layer thickness, and how much slab prep the concrete needs. Big-box options from Home Depot, Lowes, or Menards vary widely in wear layer and locking-system quality, so compare specifications, not just price per box.
One honest limitation: LVP directly on the slab is waterproof, but the floor will still feel cool in winter because the plank sits against concrete that stays at ground temperature. In a St. Louis basement without a heat source, that matters more than the flooring brochure suggests.
Hybrid Systems: A Raised Subfloor Under Waterproof Flooring
A hybrid system puts a subfloor between the slab and the finished floor, and it is the strongest answer for a basement with any moisture history. The core idea is simple: raise the walking surface slightly off the concrete so vapor coming through the slab has somewhere to go. A dimpled-membrane subfloor panel creates that air gap. Moisture under the floor can share air with the space behind wall insulation, letting water vapor migrate to drier zones and escape instead of accumulating under your finished floor.
However, a raised subfloor does more than manage vapor. It creates a thermal break, so the finished floor above it feels noticeably warmer than plank sitting on bare concrete. It also gives you a nailing or floating surface that behaves like a normal floor, which opens up carpet as an option. Carpet costs less than premium plank and cuts the echo that makes many finished basements sound hollow, a real consideration for a basement bar or media room.
Two decision rules guide whether a hybrid system is worth the extra layer:
- Even a basement with a vapor barrier under the slab can still benefit from a subfloor system, because the subfloor protects the finished renovation from future moisture events like a water heater leak or a backed-up drain, not just ground vapor.
- The insulation strategy depends on the slab itself: its condition, any damp spots, and whether a vapor barrier exists beneath it. Rigid foam insulation, when used, goes directly above the slab with staggered and offset joints so it works as both a thermal break and a secondary capillary break.
Once the subfloor system is down with its air gap and thermal break in place, the finishing sequence gets simple: vapor barrier detailing, drywall, then vinyl plank floated directly on top. That is the order a careful crew follows, and it is the order a careful DIYer should follow too. If you are framing basement walls on top of a floating subfloor, follow the subfloor manufacturer's guidance so moisture behind the walls and beneath the floor can still dry; sealing everything airtight in the wrong places defeats the whole design.
This is also where basement subfloor installation and flooring choice stop being separate projects. The subfloor panels, the fasteners, the wall framing sequence, and the finished flooring all have to agree with each other, which is why it pays to plan the full stack before buying the first box of plank.
Fasteners and Panel Details That Decide Longevity
Screws or nails for subfloor panels is not a coin flip in a basement. Screws win. The best subfloor screws for panel systems over concrete are the concrete fasteners the panel manufacturer specifies, typically driven through pre-marked locations into the slab with a hammer drill. For plywood subfloor layers over sleepers or foam, coated subfloor screws hold where nails eventually work loose and squeak, and screws back out cleanly if a panel ever needs replacement after a leak.
Panel layout matters just as much. Stagger joints so four corners never meet, leave the manufacturer's expansion gap at the walls, and check the assembled surface for flatness before any flooring goes down. A raised subfloor hides slab dips, but it does not fix a badly out-of-level slab; grind or patch first when the variation is severe.
Matching Waterproof Basement Flooring to Each Room
Different basement rooms carry different moisture loads, so the smartest finished basements mix systems rather than running one product wall to wall.
Basement bathroom. A basement bathroom addition concentrates plumbing, humidity, and splash in one small room. Waterproof flooring for a basement bathroom means sheet vinyl, tile over a proper substrate, or LVP with sealed perimeter details, never carpet. This is also the room where permits are not optional; new drain lines and fixtures below grade need a permit and inspections in St. Louis, and a contractor who waves that off is creating the exact resale problem that shows up when a buyer's inspector asks whether the basement bath was permitted.
Laundry and utility areas. Flooring here should assume a hose or supply line will eventually fail. Epoxy or LVP directly over the slab, with a floor drain kept clear, handles that scenario. Skip the raised subfloor in the room most likely to see standing water; keep it for the living areas next door.
Bedrooms and living areas. LVP over a raised subfloor gives the warmest, quietest result, and carpet over that same subfloor costs less and softens sound further. For a basement bedroom, remember that flooring is the easy part; egress requirements drive whether the room can legally be a bedroom at all, which is a permit and code question to settle before finishing begins.
Basements that flood. If the space has taken on standing water more than once, choose flooring you can dry out or lift. Interlocking raised tiles, epoxy, or loose-laid LVP all recover from a flood far better than glued or nailed floors. In flood-prone Metro East areas, solving the water entry itself, through grading, drainage, or a sump system, comes before any finished flooring makes sense. No flooring product fixes a drainage problem.
An Illustrative St. Louis Project, Start to Finish
Suppose a homeowner in south St. Louis County has a 900-square-foot basement in a 1960s house. The plastic-sheet test shows light condensation, there was one minor water event years ago after a downspout clogged, and the plan is a family room, a small bar, and a half bath. In that scenario, a sensible flooring plan looks like this: fix the downspout and grading first, epoxy the mechanical room floor to contain dust, run a dimpled-membrane subfloor with LVP through the family room and bar, and put sheet vinyl or tile in the bathroom.
The permit picture in that scenario is layered, which is normal. The bathroom plumbing needs its own permit and inspections, the electrical work is inspected separately, and the general finish work falls under the building permit. A contractor working in St. Louis regularly should pull those permits and schedule the inspections, not hand the task back to you. Permits do add steps, but the alternative, an unpermitted basement finish surfacing during a home sale, costs far more in delay and renegotiation than the inspections ever did.
One more scope note for older homes: exposed basement wiring has its own rules. Non-metallic sheathed cable, the Romex most houses are wired with, is not considered best practice for exposed conduit runs, and running it inside EMT is against code in damp or wet locations, according to the National Electrical Code (NFPA 70). Details like that are why the flooring plan, the framing plan, and the permit plan should be one plan.
Checking Your Work: Signs the System Is Failing
Whether you installed the floor yourself or inherited it with the house, the same checks apply. Catching a moisture problem early usually means replacing a few panels instead of the whole floor.
- A musty odor that intensifies when the HVAC runs or after rain.
- Cupping, peaking, or gaps opening between planks that were tight at install.
- Soft or spongy spots underfoot, the classic sign of subfloor rot in wood-based panels.
- Dark staining or efflorescence, a white mineral crust, creeping up from the base trim.
- Adhesive failure or bubbling in glued or coated floors. In fresh concrete, blisters come from trapped air, often from floating the surface too soon or from a vapor barrier preventing water from absorbing into the subgrade, according to NRMCA; in a finished floor, bubbling usually means vapor pressure underneath.
If you find soft spots or rot, plywood subfloor replacement in the affected area beats living with it; rot spreads, and it feeds mold. Pull the finished flooring back, cut out the damaged panels, confirm the moisture source is fixed, and rebuild with the same fastener and gap details as the original install.
When to Bring in a Contractor Instead of Pushing Through
A capable DIYer can float LVP, roll a moisture barrier, and even install a panel subfloor system over a clean slab. Some situations call for more than that. Active water intrusion, a slab with major cracking or heaving, or any project touching a load-bearing wall or new below-grade plumbing belongs with a contractor, and in some structural cases with an engineer before anyone starts finishing. Moisture problems must be solved at the source before finish work begins; flooring installed over an unresolved water issue is money spent twice.
For everyone else, the path is clear as of 2026: test the slab, choose the system that matches your moisture reality and room use, install the moisture barrier or subfloor the manufacturer's way, and keep the permit trail clean. Do those four things and a finished St. Louis basement floor stops being a gamble and becomes the most durable surface in the house.
If you need basement finishing, STL Basement Finishing can help.
Prefer to talk it through? Call (314) 916-6297 — a quick call is usually the fastest way to get a straight answer for your situation.