Basement Flooring and Radiant Heating in St. Louis: What Works, What Fails, What It Costs
If you are weighing basement flooring with radiant heating, you are really making two decisions at once: what goes under your feet, and whether the concrete slab beneath it can support a heated floor without turning a moisture problem into a disaster. In St. Louis, where clay soil, humid summers, and heavy spring rains push water vapor up through basement slabs year-round, those two decisions cannot be separated. This guide walks through which flooring materials actually pair well with radiant heat basement flooring, what the slab has to look like before anyone installs anything, and the cost factors that decide whether heated floors belong in your basement finishing budget.
One note up front, especially if you have been burned before. If water has ever come into your basement after a storm, radiant heating does not fix that, and no flooring hides it for long. Heat over a damp slab accelerates vapor drive, feeds mold under the finish floor, and warps anything wood-based faster than an unheated floor would. The moisture question comes first in this article because it has to come first on the job.
Why Basements Feel Cold, and Why Flooring Alone Will Not Fix It
A basement slab in St. Louis sits in ground that stays around the mid-50s Fahrenheit most of the year. Concrete conducts that temperature straight up into whatever touches it. Lay carpet directly on the slab and the carpet feels cold. Lay luxury vinyl plank directly on the slab and the plank feels cold. The material is not the problem; the thermal path from the earth to your socks is.
There are two ways to break that path. The first is a thermal break: rigid insulation or a raised subfloor panel that separates the finish floor from the concrete. The second is adding heat, which is where basement radiant floor heating comes in. Additionally, the best finished basements in this climate often use both, because insulation without heat still leaves a cool floor, and heat without insulation sends a chunk of your energy bill into the dirt below the slab.
For a growing family planning a playroom or a guest suite downstairs, this matters in a practical way. Kids sit on basement floors. Guests walk on them barefoot. A floor that reads 58 degrees in January gets a room nobody uses, which defeats the point of spending finishing money in the first place.
Can You Put Heated Floors in a Basement?
Yes, you can put radiant heat in a basement, and basements are one of the better applications for radiant heat because the slab's chill is exactly what radiant systems counter. The requirements are a dry slab, insulation beneath the heating layer, and a finish floor rated for radiant use. Skip any of those three and the system underperforms or fails.
There are two main system types to understand before you talk flooring:
- Electric radiant mats or cables. Thin heating elements laid over the slab (and over insulation), then embedded in thinset or a self-leveling layer under the finish floor. Lower upfront cost, simpler install, best for single rooms like a basement bathroom or a play area. Operating cost depends on your electric rates and how many square feet you heat.
- Hydronic radiant tubing. PEX tubing circulating warm water, usually embedded in a thin concrete or gypsum overpour, fed by a boiler or water heater. Higher upfront cost and more mechanical complexity, but cheaper to run across large areas. A basement hydronic radiant floor heating retrofit makes the most sense when you are finishing the whole lower level and already have, or plan to add, a compatible heat source.
For most St. Louis basement remodeling projects in the $12,000 to $40,000 range, electric mats in targeted zones are the realistic choice. Whole-basement hydronic systems usually belong to larger budgets or homes where a boiler already exists. Either way, a licensed electrician or plumber handles the connections, and the electrical or mechanical work is part of what the permit covers.
The Moisture Test Comes Before Any Heating Decision
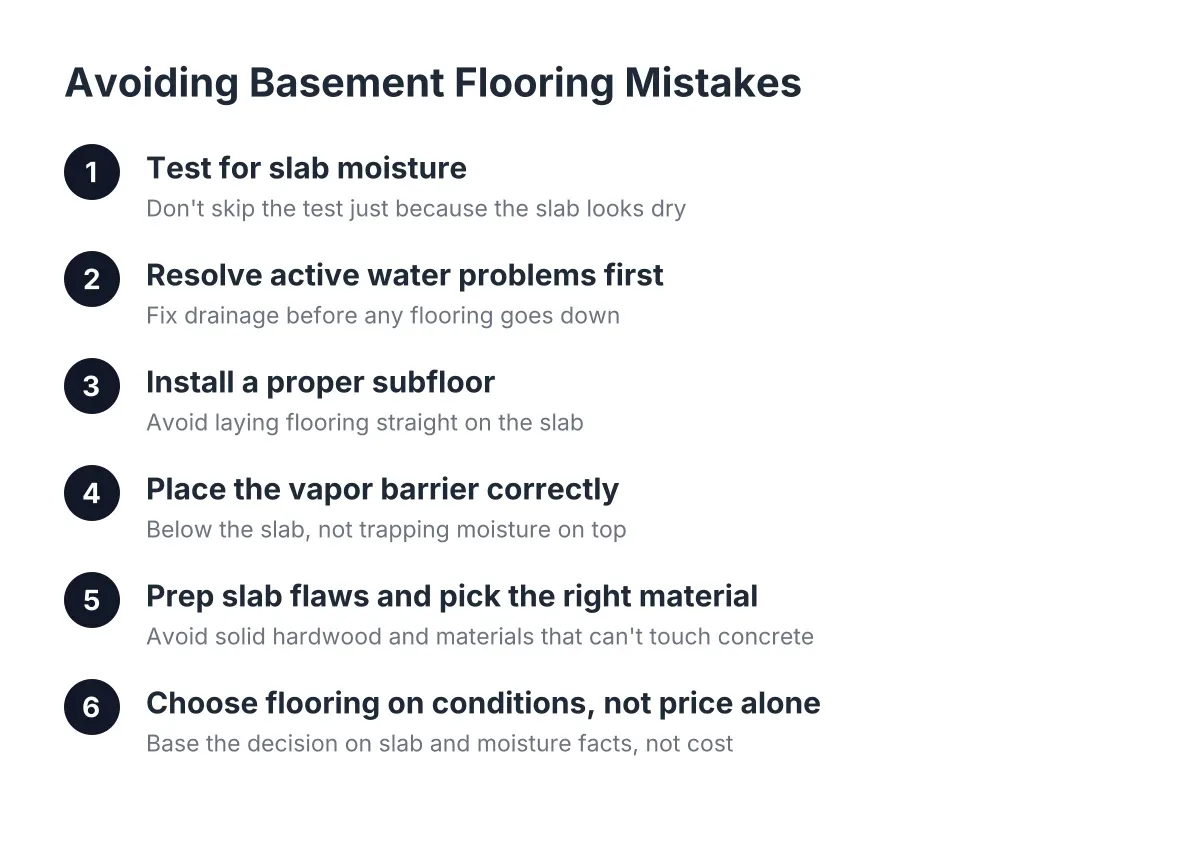
Before anyone prices a heated floor, the slab has to prove it is dry enough to build on. This is the step that separates a contractor doing basement finishing after water damage correctly from one who covers the problem and leaves. If a previous contractor put carpet straight on your slab and never mentioned moisture, that is the shortcut that produces the musty smell after rain.
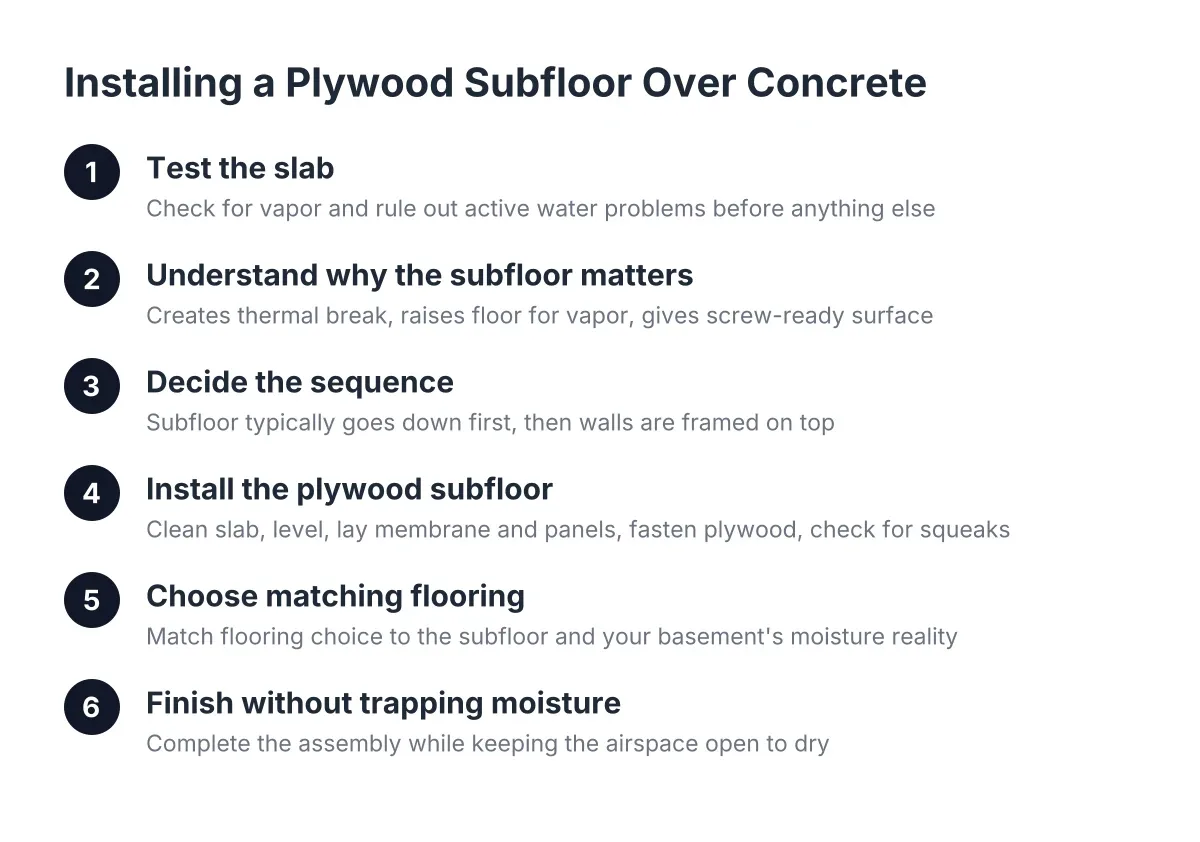
Here is what should happen first, in order:
- Resolve drainage and intrusion. Gutters, grading, sump pump condition, and any crack or cove seepage get addressed before finishing starts. Insulating or heating over unresolved moisture problems traps water where it degrades framing and flooring fast.
- Test the slab for vapor. A simple plastic-sheet test taped to the concrete for a few days, or a calcium chloride test for harder numbers, shows whether ground moisture is migrating up through the slab.
- Find out whether a vapor barrier exists under the slab. A vapor barrier placed under a concrete slab is meant to block moisture transmission from the ground into the concrete above, according to W. R. Meadows. Many older St. Louis homes were poured without one, which changes the insulation strategy on top.
- Choose the slab buildup based on what the tests show. A dry slab with a barrier beneath it can take rigid foam directly on the concrete. A slab with damp spots or no barrier needs a dimpled membrane subfloor or a surface-applied vapor retarder before anything else goes down.
Even a basement with a vapor barrier under the slab benefits from a subfloor system on top, because the subfloor protects the finished floor from future moisture events, not just today's conditions. That is the honest answer to "it's dry now": dry now is not a promise about the next ten-year storm, so the floor assembly should assume some water vapor will always be present.
How Radiant Heating Changes the Basement Flooring Choice
Radiant heat narrows your flooring list, because the finish material now has to do two jobs: survive slab moisture and transmit heat efficiently without being damaged by it. Dense, thin, dimensionally stable materials work best. Thick, soft, or moisture-sensitive materials either block the heat or get wrecked by it. That reshuffles the usual rankings of basement flooring options in ways worth walking through material by material.
Tile and Stone: The Best Conductors
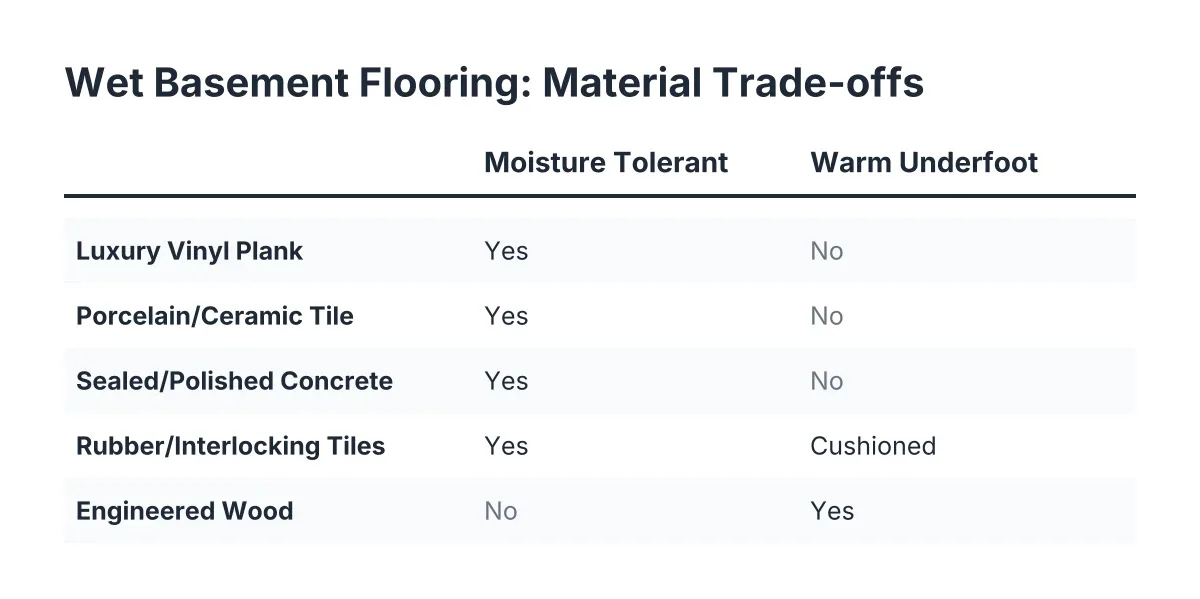
Porcelain and ceramic tile are the top performers over radiant heat. They conduct heat well, hold it, and shrug off both the warmth and any slab moisture. Tile over an electric mat is the standard build for a basement bathroom, and it turns the coldest floor in the house into the warmest.
The trade-offs are real, though. Tile is among the pricier choices once you count the mat, self-leveler, and labor. It is also hard underfoot, which matters less in a bathroom and more in a playroom where a toddler falls twenty times a day.
Luxury Vinyl Plank: The Practical Middle Ground
LVP has become the default basement floor in this region for good reason. It resists humidity and slab moisture, and it does not cup, bow, or buckle the way solid or engineered wood can when the basement air swings between a damp August and a furnace-dry January. Most quality LVP lines are rated for radiant heat, typically with a surface temperature cap around 80 to 85 degrees; check the specific product's rating before buying.
Over radiant heat, LVP conducts reasonably well because it is thin and dense. Choose a floating click-lock product rather than glue-down when heat is involved, and use the underlayment the manufacturer specifies rather than a thick foam pad that insulates the heat away from the room. Lighter plank colors also hide dust and scuffs better in a high-traffic family space, which keeps the room looking finished longer.
Carpet: Comfort First, Conduction Last
Carpet is the comfort pick, and for a children's play area it is close to essential; nobody wants kids tumbling on tile. It also costs less per square foot than premium plank products and softens the echo that makes many finished basements sound hollow. However, carpet and pad act as a blanket over a radiant floor. The heat still comes through, but slower and at higher operating cost, and thick padding can push the system past its effective range.
If your heart is set on carpet in the main area, there is a sensible compromise: run radiant heat only in the hard-floored zones, such as the basement bathroom and a tiled landing, and rely on an insulated subfloor plus conventional basement heating for the carpeted playroom. You get the warm tile where bare feet meet floor and the soft surface where kids play, without paying to push heat through padding.
Hardwood: Mostly a No Below Grade
Solid hardwood over a heated basement slab combines two failure modes: below-grade moisture and heat-driven movement. It shrinks, gaps, and cups. Some engineered wood products carry radiant ratings, but even those demand tight humidity control that a St. Louis basement rarely offers without dedicated dehumidification. If the wood look matters to you, wood-look LVP or tile delivers it with none of the risk. The comparison between carpet vs hardwood basement installs almost always resolves the same way below grade: carpet where comfort rules, and a wood look achieved in vinyl or tile rather than actual wood.
What Installing Radiant Heat Under Basement Flooring Involves
Installing radiant floor heating in a basement follows a layered sequence: moisture control on the slab, rigid insulation, the heating element, an embedding layer, and then the finish floor. Each layer exists for a reason, and the order does not change. Understanding the stack helps you evaluate any bid you receive.
A typical over-slab electric install looks like this:
- Slab prep. Clean, grind high spots, and address cracks. Confirm moisture readings are within range.
- Vapor and thermal layer. Rigid foam insulation goes down with staggered, offset joints, which gives both a thermal break and a secondary capillary break against slab moisture. On damp-prone slabs, a dimpled membrane subfloor panel raised slightly off the concrete does similar work while letting vapor under the floor migrate to drier zones and escape instead of accumulating.
- Heating element. Electric mats or cables laid per the room plan, with sensors placed for the thermostat. Hydronic jobs lay PEX tubing here instead.
- Embedding layer. Self-leveling compound or thinset locks the element in place and spreads heat evenly so you do not feel stripes of warm and cool.
- Finish floor. Tile sets directly in thinset; LVP floats on top per the manufacturer's radiant specs.
Height is the constraint homeowners miss. Insulation, heating, embedding, and finish floor together can add one and a half to three inches to the floor. In a basement with seven-foot-six ceilings, that eats headroom and can run afoul of ceiling-height requirements for habitable rooms. It also affects stair bottom-riser height, which inspectors check. This is one place a load-bearing wall assessment and a hard look at mechanical clearances earn their keep before any material gets ordered.
On the electrical side, the circuits feeding radiant mats and basement outlets must be run correctly for the environment. Running non-metallic sheathed cable inside EMT conduit is against code in damp or wet locations under the National Electrical Code, which is one reason basement wiring decisions should not be left to whoever bids lowest.
What Basement Flooring Radiant Heating Costs Depend On
The cost of basement flooring radiant heat in 2026 comes down to five factors: system type, square footage heated, slab condition, finish material, and the electrical or mechanical work needed to power it. Two basements with identical footprints can land far apart in price because of what the slab demands before heat ever goes in.
Here is what moves the number, in rough order of impact:
- Heated area. Electric radiant pricing scales with square footage, so heating a 60-square-foot bathroom costs a fraction of heating an 800-square-foot family room. Zoning only the rooms where warm floors matter is the biggest lever a budget-conscious family has.
- System type. Electric mats cost less to install and more to run; hydronic costs more to install and less to run over large areas. Below a few hundred square feet, electric nearly always wins on total cost.
- Slab and moisture prep. A dry, flat slab needs insulation and leveling. A slab with seepage history needs drainage work, membranes, or a full subfloor system first. This is the line item that varies most across St. Louis homes, and it is the one worth paying for.
- Finish floor. Tile adds material and labor cost over LVP; carpet lowers flooring cost but reduces what the heating system delivers.
- Electrical capacity and permits. A dedicated circuit, thermostat wiring, and sometimes panel work add cost. In St. Louis and St. Louis County, finished basement work involving electrical and heating changes needs a permit, and the inspection is protection, not red tape, especially for a radiant system buried under your floor.
For a hypothetical example, suppose a family in South St. Louis County is finishing an 700-square-foot basement as a playroom, guest room, and small bathroom on a $30,000 budget. In that scenario, a sensible plan might put an electric radiant mat under tile in the bathroom only, an insulated subfloor with LVP in the guest room, and the same subfloor with carpet in the playroom. They get a warm bathroom floor, a moisture-protected assembly everywhere, and the comfort surface kids need, without funding heat under 600 square feet of carpet pad.
Retrofitting Radiant Heat Into an Already Finished Basement
A basement radiant floor heating retrofit in a finished space means removing the existing finish floor, because the heating layer has to sit directly beneath it. There is no practical way to slide heat under an installed basement floor from above, and heating from the joist bays above only warms the main level, not the basement.
Therefore, the honest advice is timing. If you are already planning basement remodeling, flooring replacement, or repairs after a water event, that is the moment radiant heat is cheap to add relative to its standalone cost; the floor is open anyway. If your finished floor is in good shape and the basement just runs cool, a dehumidifier, rug strategy, and a review of your existing basement heating setup may solve the comfort problem for far less money.
A retrofit after water damage carries one advantage worth naming. Tearing out a failed floor exposes the slab, which means the moisture testing, drainage fixes, and insulation that should have happened the first time can happen now. For a homeowner whose last contractor glued carpet to damp concrete, the rebuild is the chance to get the assembly right from the slab up.
How to Decide: A Short Framework
Pull the whole decision into four questions, answered in this order.
- Is the moisture problem solved, not just quiet? If water has entered the basement, drainage and intrusion fixes come before flooring or heat. No exceptions.
- Which rooms actually need warm floors? Bathrooms and hard-floored zones benefit most. Carpeted playrooms benefit least.
- Does the finish material match the heat? Tile first, LVP second, carpet only with eyes open, solid hardwood not at all below grade.
- Does the budget favor zoned electric or whole-floor hydronic? For most family finishing projects under $40,000, zoned electric under tile is the answer; whole-basement hydronic is a larger-project decision.
One limitation to state plainly: no article can tell you whether your specific slab is ready for heat and finish flooring. That takes moisture testing on your concrete, a look at your drainage, and sometimes input from a structural or waterproofing professional before the basement finishing contractor ever frames a wall. A contractor who starts with those tests, explains the permit process, and prices the moisture prep as its own line item is showing you how the rest of the job will go. One who quotes flooring without ever touching the slab is showing you that too.
If you need basement finishing, STL Basement Finishing can help.
Prefer to talk it through? Call (314) 916-6297 — a quick call is usually the fastest way to get a straight answer for your situation.