Epoxy Basement Flooring Cost and Install Timeline for St. Louis Homes
If you are pricing out a finished basement in St. Louis, epoxy basement flooring cost is one of the first numbers you will chase, and one of the hardest to pin down. That is because epoxy pricing is not really about the coating. It is about the condition of your concrete slab, how much moisture is moving through it, and how much prep the floor needs before anyone opens a bucket. This guide walks you through the process step by step, so you understand what drives the price and how long the work actually takes in a typical St. Louis basement.
One note before we start. Epoxy is one option among several basement flooring options, and it is not the right call for every space. It shines in utility rooms, workshop areas, and bar zones where you want a hard, cleanable surface. It is a tougher sell in a space meant for movie nights or a kids' play area, where carpet is close to essential for comfort and sound. Keep that trade-off in mind as you work through the steps below.
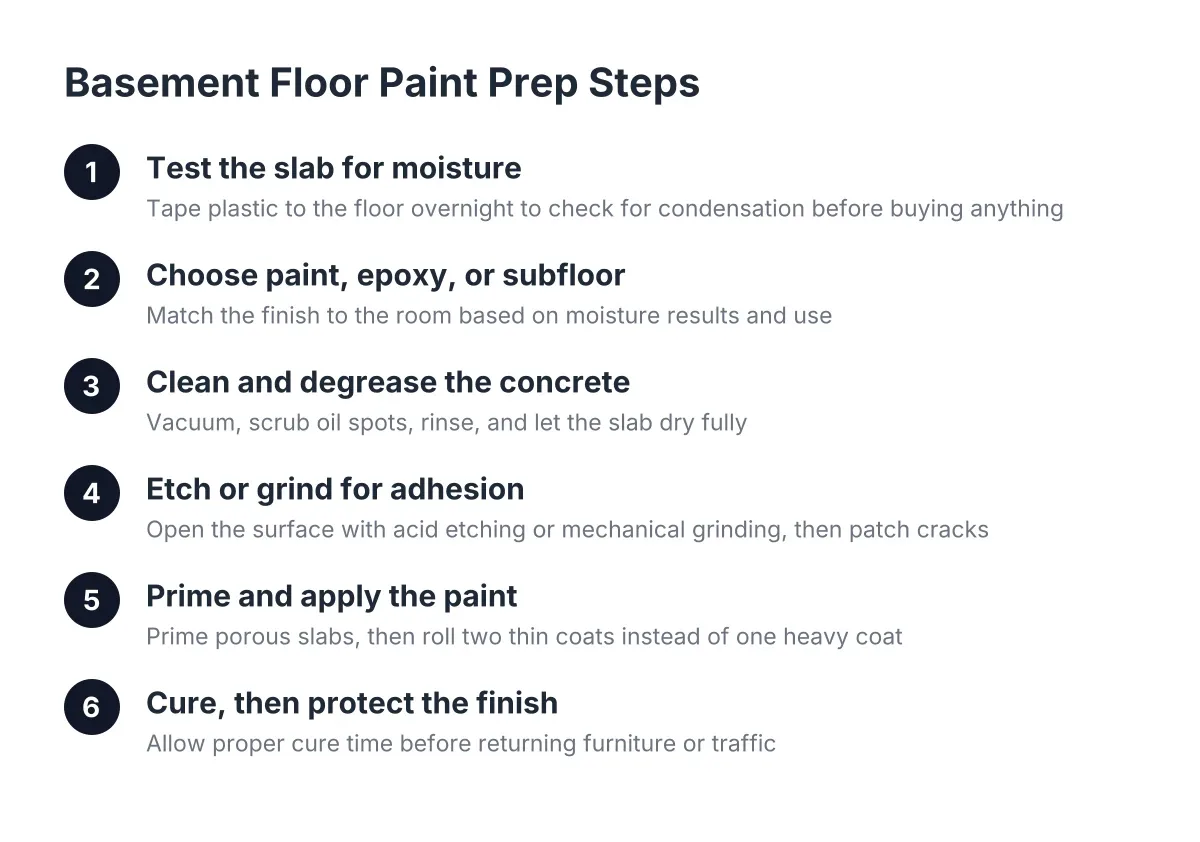
Step 1: Test Your Slab for Moisture Before You Price Anything
Start with moisture, not color charts. Epoxy is a coating that bonds to concrete, and moisture pushing up through the slab is the number one reason coatings fail in basements. St. Louis sits on clay-heavy soil with a high water table in plenty of neighborhoods, and older homes here, many of them 20 years old or more, were often poured without any vapor barrier under the slab.
A vapor barrier placed over the base course under a concrete slab is meant to block moisture transmission from the ground into the concrete above, according to W. R. Meadows. If your home predates that practice, ground moisture can migrate straight up through the concrete. Trapped water under a fresh coating is how you get bubbling and peeling within a year or two.
The simple homeowner test: tape a two-foot square of plastic sheeting to the slab, seal all four edges, and leave it for 24 to 72 hours. Condensation or a dark spot under the plastic means moisture is coming through. In that case, budget for a moisture-mitigating primer or reconsider epoxy entirely; that single finding changes your epoxy basement flooring cost more than any other factor.
Step 2: Walk the Floor and Add Up the Prep Work
Next, inspect the slab itself, because prep is where the money goes. On most basement epoxy jobs, surface preparation accounts for more labor hours than the coating itself. Walk the floor and note:
- Cracks, and whether they are hairline or wide enough to catch a fingernail
- Spalling or flaking patches where the surface is breaking down
- Old paint or sealer, including any previous concrete basement floor paint that must come off completely
- Low spots that hold water when you pour a cup out on the floor
- Oil stains near a former workshop or old furnace location
Each item adds a line to the bill. Grinding off old paint takes time and equipment. Crack repair and patching add material and cure time. A slab that was painted twice in the 1980s and has settled near the floor drain will cost meaningfully more to prep than a clean, bare slab of the same size, even though the epoxy going down is identical.
Step 3: How Basement Flooring Epoxy Cost Breaks Down
How basement flooring epoxy cost breaks down is a short list: square footage, slab condition, moisture mitigation, the coating system you choose, and who does the work. Square footage sets the baseline, but the other four factors decide whether your project lands at the low end of the range or well above it. We will not quote a cost per square foot here, because slab condition swings the number too far to make a blanket figure honest.
Here is how each factor moves the price:
- Coating system. A single-coat product costs less than a full system with primer, base coat, decorative flakes, and a urethane topcoat. The full system lasts longer and hides slab imperfections better.
- Moisture mitigation. If your Step 1 test showed vapor coming through, a moisture-tolerant primer or mitigation layer adds a real chunk to the budget.
- Prep hours. Grinding, patching, and stripping old coatings are billed labor. More damage means more hours.
- Layout. A wide-open rectangle coats fast. A basement chopped up by a load-bearing wall, ductwork chases, and a future basement bathroom rough-in takes longer to cut in and detail.
- DIY versus professional. Kits from the home center cost less up front, but consumer-grade products are thinner and more likely to fail on a moisture-prone slab. If you are comparing epoxy basement flooring cost for DIY against a contractor bid, make sure you are comparing the same coating system, not just the same square footage.
Step 4: Decide Where Epoxy Fits in Your Finished Basement Plan
Now zoom out and decide which rooms actually get epoxy. Suppose a homeowner in South County is finishing 900 square feet with a basement bar, a TV area, and a utility room. In that scenario, a practical split is epoxy in the utility room, luxury vinyl plank around the bar, and carpet in the TV zone. That mix is common for a reason.
Coating the utility room floor earns its keep even if you finish nothing else. A sealed floor in the mechanical space contains concrete dust so it does not migrate into the finished living area every time someone opens the door. It also wipes clean after a water heater hiccup.
For the living zones, weigh the alternatives honestly. Carpet costs less than premium plank flooring and absorbs echo, which matters in a room with a concrete slab overhead and drywall walls. Luxury vinyl plank handles basement humidity without cupping or buckling the way solid or engineered wood can, which is why LVP flooring in a basement has largely replaced hardwood below grade. Epoxy beats both on durability and cleanability, but it is hard underfoot, cold without basement heating, and loud. Lighter flake colors are also easier to keep looking clean than dark solid colors, worth remembering when you pick a blend.
If you are still weighing all of this as part of a bigger basement flooring cost comparison, that is a separate decision from this install guide; the point here is that epoxy rarely covers the whole basement, and your budget should reflect the split.
Step 5: Map Out the Installation Timeline
Plan for the basement to be off limits for several days, not one afternoon. The exact schedule depends on slab condition, product chemistry, and basement temperature, but the sequence is consistent. A typical professional job runs in this order:
- Clear and protect. Everything comes off the floor. Stair bottoms and wall bases get masked.
- Grind and repair. The crew grinds the slab to open the concrete's pores, then patches cracks and spalls. This is the dusty day, and diamond grinding with vacuum shrouds keeps most of it contained.
- Prime. A primer coat, moisture-tolerant if Step 1 demanded it, goes down and cures.
- Base coat and flakes. The color coat is rolled out; decorative flakes are broadcast while it is wet.
- Topcoat. A clear wear layer seals everything.
- Cure. Light foot traffic is usually possible within a day or so of the final coat; furniture and heavy use wait longer, per the product's cure schedule.
Temperature matters more than most homeowners expect. A cold St. Louis basement in January slows cure times between every coat, which stretches the schedule. If the basement lacks heat, plan the coating work for milder months or after basement heating installation, not before.
One honest caveat: if your slab shows heaving, wide structural cracks, or signs of active water intrusion rather than vapor, stop and bring in a professional before coating anything. Epoxy locks in whatever is happening below it, and no coating fixes a drainage or structural problem.
Step 6: Get Bids That Separate Prep, Mitigation, and Coating
Finally, when you collect quotes in 2026, insist that each contractor break the bid into three parts: surface prep, moisture mitigation if needed, and the coating system itself. A single lump number hides the assumptions, and the assumptions are where surprise costs live. Two bids that look far apart often converge once you see that one includes grinding and a moisture primer and the other does not.
Ask each bidder three questions: What did your moisture test show, and how does the bid respond to it? What grind and repair work is included? What is the full coating stack, layer by layer? A contractor who has coated basements around St. Louis will answer all three without flinching. That is also a good moment to ask the questions that come with any finishing project, like whether the flooring work triggers a permit when it is bundled with framing or a basement bathroom addition; flooring alone typically does not, but the surrounding remodel might.
Handled in this order, moisture test first, prep assessment second, bids last, epoxy is a predictable line item instead of a gamble. You will know why the number is what it is before anyone mixes a batch, which is the whole point of pricing a basement without surprises.
If you need basement finishing, STL Basement Finishing can help.
Prefer to talk it through? Call (314) 916-6297 — a quick call is usually the fastest way to get a straight answer for your situation.