Basement Subfloor Installation vs. Epoxy in St. Louis: Materials, Labor, and Prep Compared
If you have been searching for epoxy basement flooring cost figures and finding everything from a few hundred dollars in DIY kits to five-figure professional quotes, you are not confused. The range is real. Epoxy pricing swings widely because the coating itself is often the cheapest part of the job; the concrete slab underneath it, and the moisture moving through that slab, drive most of what you actually pay. This guide breaks the cost down into its three real components for St. Louis basements: materials, labor, and prep. It also explains the part most epoxy articles skip, which is when a basement floor should not get epoxy at all and needs basement subfloor installation instead.
That last point matters because most of the generic epoxy cost content online was written for garages. A garage slab and a basement slab live in different worlds. Your basement slab sits below grade, surrounded by soil that holds water after every heavy St. Louis rain. That changes the prep, the product selection, and the price. It can also change the answer entirely if you plan to put finished living space, a basement bar, or a basement bathroom down there.
What Actually Drives Epoxy Basement Flooring Cost
Three things determine what you pay to epoxy a basement floor: the condition of the concrete, the quality of the coating system, and who does the work. Slab condition is the biggest variable. A flat, dry, uncracked slab costs far less to coat than one with damp spots, old paint, patches, or moisture pushing up from below.
Homeowners tend to price epoxy backwards. They look up the cost of the coating first, then treat prep as a footnote. On a below-grade slab, prep is the project. Grinding, crack repair, patching, and moisture testing can eat more of the budget than the epoxy itself, especially on an older slab.
Here is where the money goes, in rough order of how much it typically influences the final bill:
- Surface prep. Diamond grinding or shot blasting to open the concrete so the epoxy bonds, plus crack and spall repair.
- Moisture mitigation. Testing the slab, and if it reads wet, applying a moisture-tolerant primer or vapor-mitigating base coat before any color coat goes down.
- Coating system quality. One-coat paint-style products at the low end; 100 percent solids epoxy with a urethane topcoat at the high end.
- Labor. Professional installation versus a DIY weekend, which is a bigger gap in quality than most homeowners expect.
- Square footage and layout. More area lowers the cost per square foot, while stairs, mechanical rooms, and cut-up floor plans raise it.
If a contractor quotes you a single flat number over the phone without asking about slab age, past water events, or existing coatings, that number is a placeholder, not an estimate. The honest answer to epoxy basement flooring cost always starts with questions about your specific slab.
Material Costs: Not All Epoxy Is the Same Product
The word epoxy covers products that have little in common beyond the name. At the bottom of the market are one-part epoxy paints sold in home centers. They roll on like paint, cost the least per square foot, and wear like paint. In a basement that sees foot traffic, furniture, and occasional dampness, they can peel within a couple of years.
In the middle are two-part water-based or solvent-based epoxy kits. These are the classic weekend DIY products. They perform better than paint but still contain a large share of carrier liquid that evaporates, leaving a thinner film than the marketing photos suggest.
At the top are 100 percent solids epoxies, usually installed by professionals. Nothing evaporates; the full thickness you apply is the thickness you keep. These systems often include a primer coat, a body coat with optional decorative flakes, and a urethane or polyaspartic topcoat for scratch and UV resistance. Material cost per square foot can run several times the price of a DIY kit, and the difference shows up in durability, not just looks.
For a basement specifically, the material question is not only about durability. It is about moisture tolerance. Standard epoxy does not breathe. If water vapor is migrating up through your slab, a non-breathable coating traps it, and hydrostatic pressure will eventually push the coating off the concrete. Moisture-mitigating primers exist for exactly this problem, and they add real material cost. Skipping them to hit a lower price is one of the most common ways a cheap epoxy job fails in year two.
Labor and Prep: Where St. Louis Basement Slabs Get Expensive
Labor on an epoxy job is mostly prep labor. The coating goes on in hours; the prep can take days. A professional crew grinds the slab with diamond tooling to remove laitance and old sealers, vacuums the dust, repairs cracks and divots, and tests moisture before opening the first pail of epoxy.
Older St. Louis homes complicate every one of those steps. Many slabs in homes built before modern practice have no vapor barrier underneath. A vapor barrier placed over the base course under a concrete slab is meant to block moisture transmission from the ground into the concrete above, according to W. R. Meadows. Without one, the slab acts like a slow wick, pulling ground moisture upward year-round. That does not automatically rule out epoxy, but it usually means moisture testing, a mitigation primer, and more labor hours.
Patching adds cost too, and it rewards experience. For example, using sand mix rather than standard concrete mix for floor patches produces a smoother surface that telegraphs less through the finished coating. Small craft decisions like that separate a floor that looks right for a decade from one that shows every repair.
Suppose a homeowner in South County has an 800 square foot basement with a hairline crack across one corner, some old latex paint near the laundry area, and a slab that reads damp after spring rains. In that scenario, an illustrative professional bid might allocate a third of the total to grinding and paint removal, a quarter to crack repair and a moisture-tolerant primer, and the remainder to the coating system and labor. Those are estimated proportions, not quoted prices, but they show why two neighbors with the same square footage can get different numbers.
DIY Epoxy Costs Versus Professional Installation and Basement Subfloor Choices
DIY saves labor dollars and spends them on risk. A kit plus rented grinder, patch material, and supplies costs a fraction of a professional install. However, the failure modes are unforgiving. Coat over a damp slab and the epoxy peels. Skip grinding and it never bonds. Mix a two-part product wrong and you get soft spots that never cure.
A professional install costs more per square foot because you are paying for surface prep equipment, moisture diagnosis, and a system matched to your slab. For a utility room or workshop area, DIY epoxy is a reasonable gamble. For a floor that will sit under a finished basement remodel, the stakes are higher, because fixing a failed coating after walls and trim go in means tearing into finished work.
Is Epoxy Even the Right Floor for a Finished Basement?
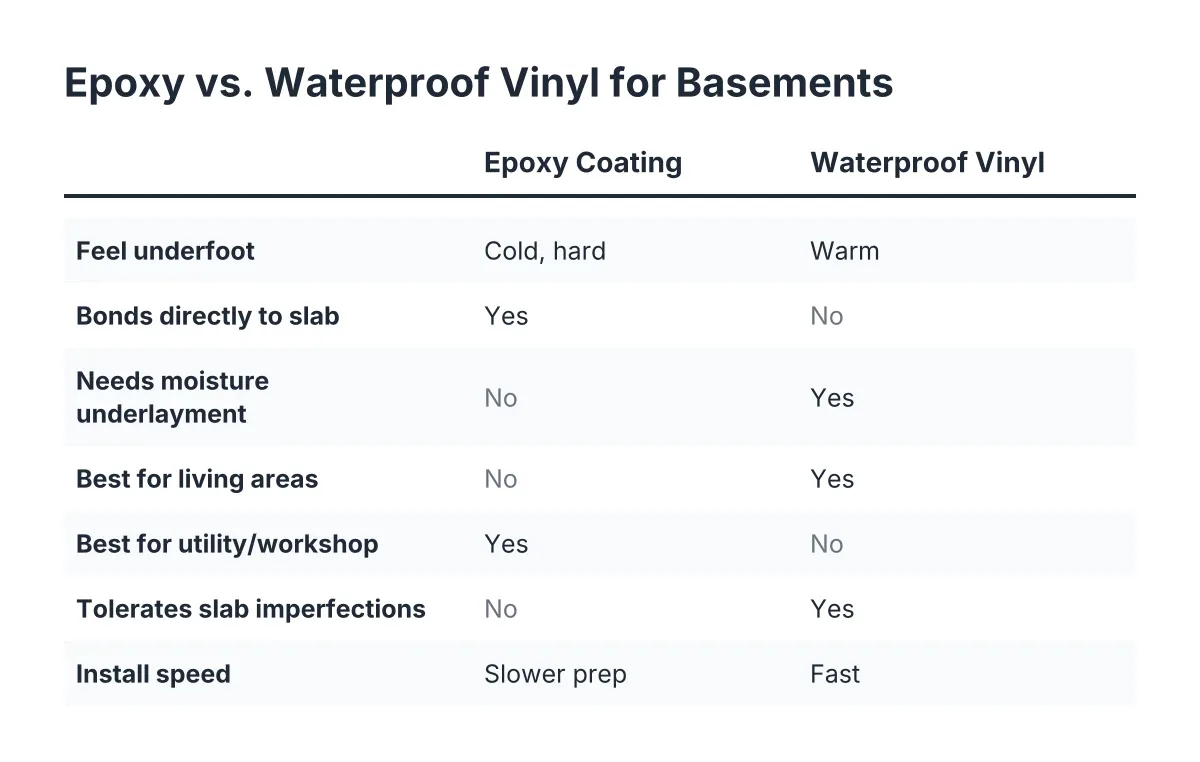
Epoxy is the right floor for some basements and the wrong foundation for others. It shines in utility rooms, workshops, laundry areas, and unfinished storage zones. Coating the floor of a basement utility room helps contain concrete dust so it does not migrate into finished living space every time the door opens. It cleans with a mop, shrugs off dropped tools, and handles a water heater leak without damage.
The picture changes when the goal is livable space. If you are a growing family trying to reclaim the basement for a playroom, guest bedroom, or home office, epoxy leaves you standing on cold, hard, loud concrete with a shiny coat on top. It does not insulate, it does not soften footsteps, and it does not warm up in a St. Louis January. Many families who start by pricing epoxy end up comparing it against a basement subfloor installation with finished flooring on top, because that is what actually delivers a room people want to spend time in.
There is a middle path worth knowing about. Some homeowners epoxy the mechanical and storage zones, then build a subfloor and finished floor in the living areas. That splits the budget where it does the most good: durable, moppable coating where water heaters and sump pumps live, and warm, quiet flooring where the kids play.
Basement Subfloor Installation Cost Compared to Epoxy
Comparing basement subfloor installation against epoxy coating is not apples to apples, because they solve different problems. Epoxy is a wear surface bonded to the slab. A subfloor is a separate structural layer, often a dimpled membrane panel or plywood subfloor raised slightly off the concrete, with carpet, luxury vinyl plank, or another finished floor on top.
The subfloor route costs more per square foot upfront. In exchange, it delivers thermal separation from the cold slab, a softer and quieter walking surface, and a drainage plane underneath the floor. A raised subfloor system lets moisture under the floor share air with drier zones and escape rather than accumulate, which protects everything above it. Even a basement with an existing vapor barrier under the slab can benefit from a subfloor system, because it protects the finished renovation from future moisture events like a failed water heater or a backed-up drain.
Finished flooring choice also shifts the math. Carpet is a lower-cost option than premium engineered flooring, and it reduces echo in a finished basement, which matters in a playroom. Luxury vinyl plank resists humidity and does not cup or buckle the way solid wood can, making it a strong basement fit. If you are budgeting a whole project, basement subfloor installation costs can vary widely based on slab condition and your chosen materials.
Moisture: The Line Item That Decides Everything
Moisture is the reason basement epoxy pricing cannot be copied from garage articles. Before any coating or subfloor goes down, someone needs to answer three questions: Is the slab damp now, has it ever flooded, and is there a vapor barrier underneath it? The insulation and flooring strategy for a basement slab depends directly on those answers.
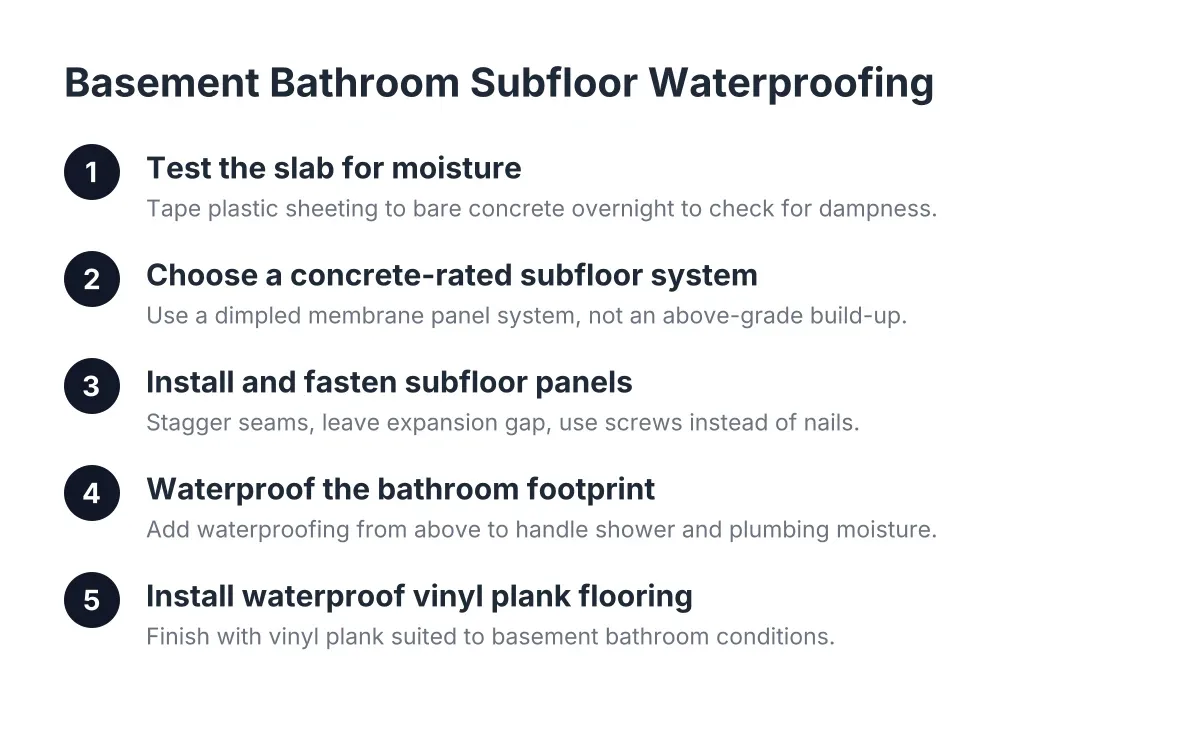
Testing is cheap relative to the cost of guessing wrong. A simple plastic sheet taped to the slab for a day or two reveals condensation from below. Professionals use calcium chloride or relative humidity probe tests for hard numbers. If the slab reads wet, the budget needs a mitigation line item, whether that means a vapor-tolerant epoxy primer, a dimpled membrane under a subfloor, or in serious cases, drainage work before any flooring at all.
One more slab detail worth knowing: surface defects are not always what they look like. Blisters in cured concrete come from trapped air, often caused by floating the surface too soon or by a vapor barrier preventing water from absorbing into the subgrade, according to NRMCA. A contractor who can read those signs will scope the prep correctly the first time, instead of discovering problems after your deposit clears.
If your basement has standing water history, active wall seepage, or a sump pump that runs constantly, stop pricing floors and start with a moisture professional. No coating or subfloor fixes a drainage problem, and money spent on flooring before drainage is money spent twice.
Budgeting the Whole Floor, Not Just the Coating
If your end goal is finished living space, price the floor as a system, not a coating. A realistic basement flooring budget accounts for the slab condition, the moisture strategy, the structural layer, and the finished surface, in that order. Here is a practical sequence for building your own number before you invite anyone into your house:
- Measure the space. Total square footage sets the baseline for every cost per square foot comparison you will make.
- Assess the slab honestly. Note cracks, damp spots, old coatings, and any flooding history. Each one adds prep cost regardless of which floor you choose.
- Test for moisture. A taped plastic sheet costs almost nothing and tells you whether mitigation belongs in the budget.
- Decide the room's job. Utility and storage zones favor epoxy. Bedrooms, playrooms, offices, and any basement bathroom favor a subfloor with finished flooring; a basement bathroom in particular needs the subfloor for bathroom conditions, meaning moisture-rated materials and correct fastening throughout.
- Get itemized bids. Ask each contractor to separate prep, moisture mitigation, materials, and labor so you can compare real scope, not just bottom lines.
That last step is your defense against the bait-and-switch pricing that makes homeowners distrust the whole industry. A low headline number with no prep line item is not a better price; it is a change order waiting for you mid-project. When two bids differ sharply, the cheaper one has usually removed moisture mitigation or grinding, which are exactly the items a below-grade floor cannot live without.
Small details in the bids tell you who knows basements. On subfloor work, screws hold better than nails over time because they resist the withdrawal forces that cause squeaks; a bid that specifies subfloor screws size and spacing rather than just saying fasteners reflects a contractor who has done this before. In addition, timing can be part of the budget conversation. When material prices are rising sharply, waiting a season for prices to stabilize can be smarter than starting a project mid-spike.
The Bottom Line for St. Louis Homeowners in 2026
Epoxy basement flooring cost in 2026 comes down to a short list: slab prep, moisture handling, coating quality, and labor. On a dry, sound slab in a utility area, epoxy is one of the most cost-effective floors you can put in a basement. On a damp slab, or under a space your family will actually live in, the honest comparison includes a subfloor system and finished flooring, and the right answer often costs more than the epoxy ads suggest.
The homeowners who avoid surprise change orders are the ones who price the slab first and the surface second. Test for moisture, get itemized bids, and make every contractor explain their prep scope in plain language. If a number seems too good to be true for a below-grade concrete floor in St. Louis, it is usually missing the part of the job that keeps the floor stuck down.
If you need basement finishing, STL Basement Finishing can help.
Prefer to talk it through? Call (314) 916-6297 — a quick call is usually the fastest way to get a straight answer for your situation.