How Moisture Problems Change Your Basement Finishing Cost in St. Louis
Most basement finishing cost guides skip the part that matters most in St. Louis: the water. They quote a national average, show a Pinterest-ready basement bar, and move on. But if your lower level has a musty smell, a white chalky stain on the concrete, or a history of water after heavy rain, the real driver of your basement finishing cost is moisture, and what it takes to deal with it before the first stud goes up. Understanding basement moisture remediation cost is essential because moisture control directly shapes your finishing budget. This guide walks through how moisture remediation and structural prep change the budget, why skipping that work costs more later, and how to think about the numbers before you call a contractor.
This matters whether your vision is a simple family room or a full build-out with a bar and bathroom. The homeowner dreaming about basement ideas, man cave layouts, and a wet bar with pendant lighting is budgeting for the same hidden line items as the homeowner who just wants the mildew smell gone. Moisture does not care what you plan to put on top of it.
Why Moisture Is the First Line Item, Not the Last
Here is the uncomfortable truth about finishing a basement in an older St. Louis home: the concrete and the framing are not the expensive risk. The water is.
Basements in this region sit in clay-heavy soil that holds water against foundation walls. Many homes in the metro area, and especially in lower-lying Metro East communities, deal with high water tables and drainage that was never designed for a finished lower level. The foundation was built to hold the house up, not to keep a carpeted media room dry.
Moisture moves through concrete in ways most homeowners never think about. Vapor pressure pushes water through porous foundation walls and slabs even when you never see a puddle. That is why a basement can smell musty without a single visible leak. The moisture is migrating through the concrete itself, evaporating into your air, and settling into anything soft you put down there.
Therefore, any honest basement finishing cost conversation starts with a question that has nothing to do with flooring or paint colors: what is the water doing, and what will it cost to control it?
Basement Moisture Remediation and Cost in Your Finishing Budget
Moisture remediation affects basement finishing cost in two directions. First, it adds scope before finishing begins, such as drainage correction, crack repair, vapor control, and sometimes exterior grading work. Second, it changes the materials used in the finish itself, from the subfloor system to the wall assembly. Both pieces belong in the budget from day one.
Think of the project as two layered budgets rather than one number.
The first layer is the fix-the-cause budget. This covers whatever is letting water reach the basement in the first place. Depending on the house, that can mean regrading soil away from the foundation, extending downspouts, sealing wall cracks, adding or servicing a sump pump, or installing interior drainage. A house that only sees humidity through the slab needs far less here than a house that takes on water every spring.
The second layer is the build-it-right budget. Even after the cause is handled, a finished basement in St. Louis should be built with the assumption that moisture will try again someday. That means a subfloor system that keeps finished flooring off the slab, wall assemblies that can dry out, and material choices that survive a future humidity spike. This layer costs more per square foot than a bare-minimum finish, and it is the layer that protects everything else you spend.
When homeowners compare quotes and one contractor is dramatically cheaper, the missing money is usually hiding in one of these two layers.
The Order of Operations: Water First, Insulation Second, Finish Last
Sequence matters more in basement work than in almost any other remodel. Moisture and drainage issues have to be resolved before insulation goes in. Insulating over an unresolved moisture problem traps water against framing and concrete, and the degradation that follows can be fast and expensive.
This is where the cost of doing things out of order shows up. Suppose a homeowner in South County frames and insulates a basement over a slab that wicks moisture every summer. For the first year, everything looks fine. Then the carpet starts smelling musty, the drywall near the floor softens, and by year three the project is being torn out and rebuilt, this time with the moisture work that should have come first. In that scenario, the homeowner pays for the basement twice.
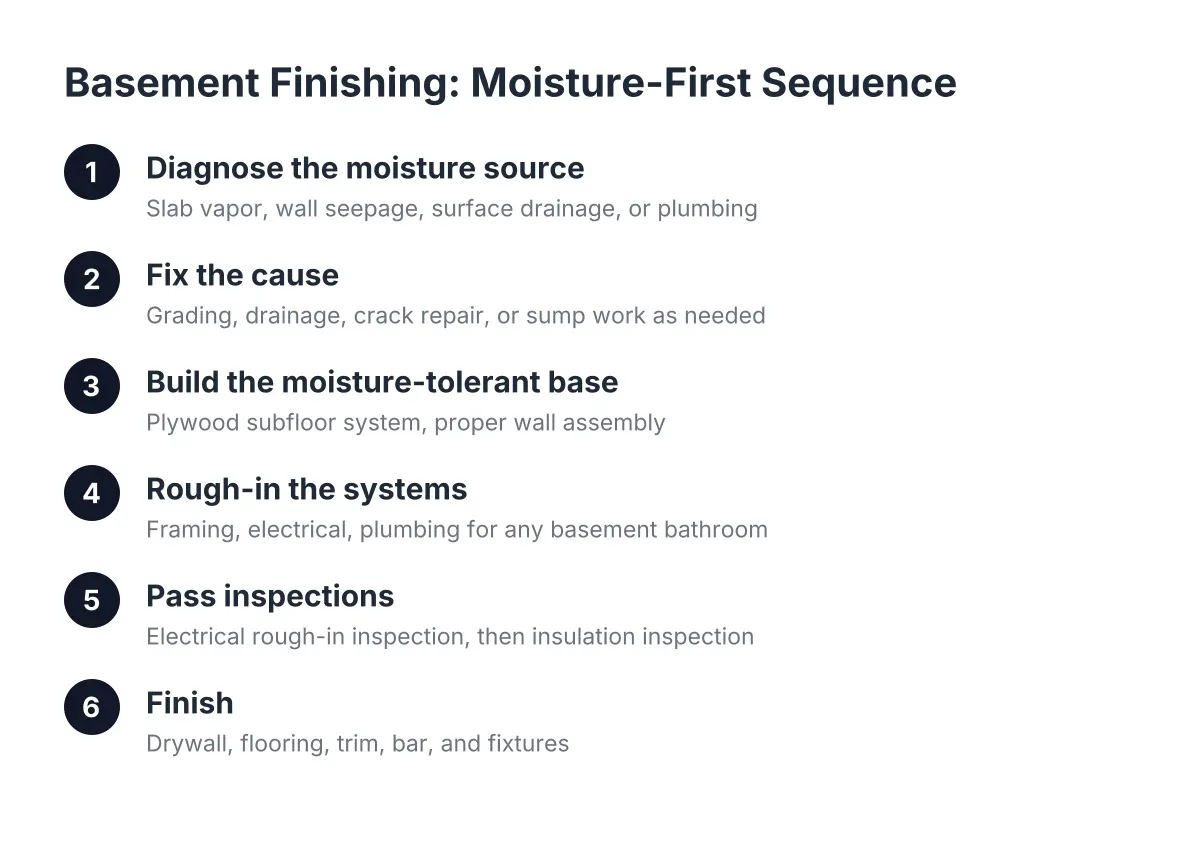
A basement-first contractor sequences the work like this:
- Diagnose the moisture source: slab vapor, wall seepage, surface drainage, or plumbing.
- Fix the cause: grading, drainage, crack repair, or sump work as needed.
- Build the moisture-tolerant base: plywood subfloor system, proper wall assembly.
- Rough-in the systems: framing, electrical, plumbing for any basement bathroom.
- Pass inspections: typically an electrical rough-in inspection, then an insulation inspection later.
- Finish: drywall, flooring, trim, bar, and fixtures.
Each step protects the money spent on the steps after it. That is the entire logic of budgeting moisture work early.
Vapor Barriers, Subfloors, and Wall Assemblies: Where the Moisture Money Goes
Three building decisions carry most of the moisture-related cost in a basement finish. None of them are glamorous. All of them determine whether your finished space is still in good shape ten years from now.
Under the slab and over it
A vapor barrier placed over the base course under a concrete slab blocks moisture from transmitting out of the ground into the concrete above, according to W. R. Meadows. Newer homes often have one. Many older St. Louis homes do not, and you cannot add one under an existing slab without major work.
However, even a basement with a vapor barrier under the slab benefits from a subfloor system on top of it. A plywood subfloor raised off the concrete creates an air gap, keeps finished flooring away from slab moisture, and gives the basement a fighting chance if a water heater fails or a storm overwhelms the sump pump. For a homeowner picturing carpet in a media area or hardwood-look flooring around a basement bar, the subfloor is what makes those choices realistic instead of risky.
Walls that can dry
Basement walls need moisture control in two directions. Warm interior air has to be kept from condensing on cold concrete, and soil moisture outside has to be kept from wicking into the framing inside. That is a different job than insulating an upstairs bedroom wall.
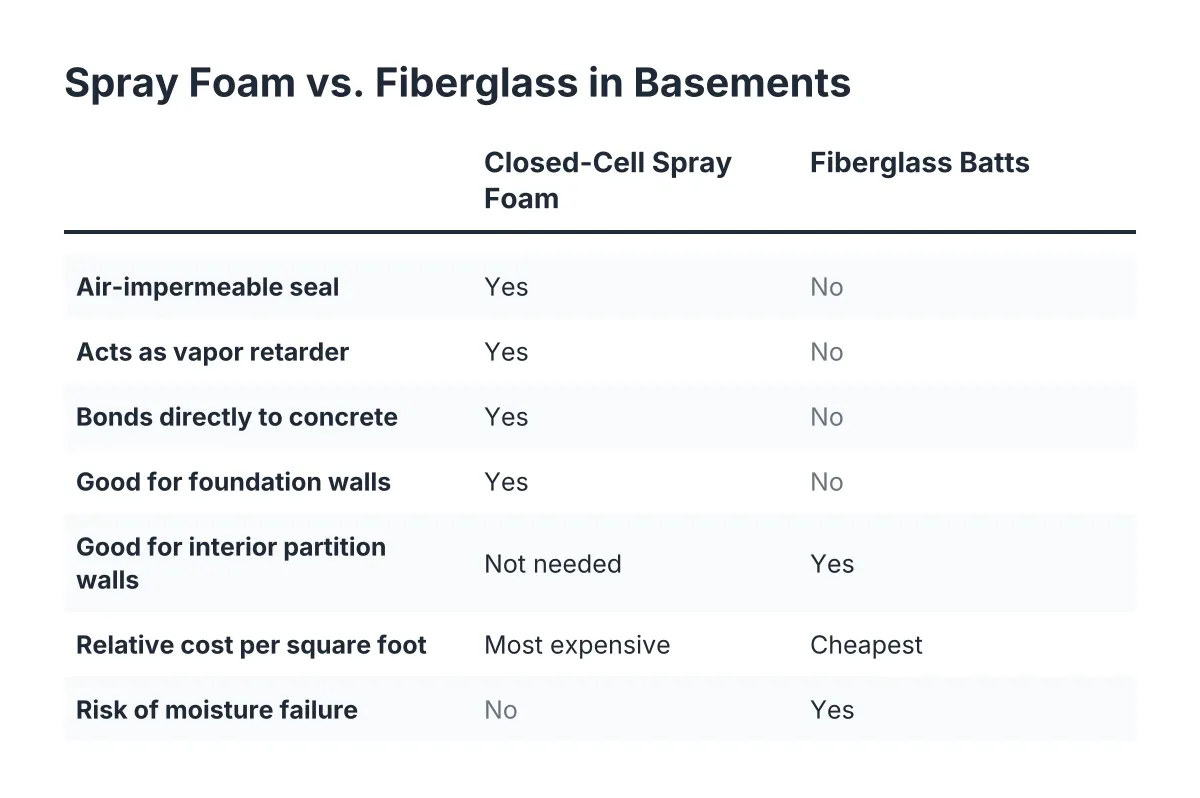
One common mistake drives a lot of tear-out work: installing a vapor barrier on the interior side of basement stud walls. Plastic sheeting behind the drywall sounds protective, but it traps moisture in the wall cavity. Any water that gets in through air leakage, capillary wicking, or a minor leak has nowhere to dry, so it sits in the cavity and feeds mold. Effective basement wall insulation needs to be air impermeable, carry a high R-value per inch, and act as its own vapor retarder so condensation never forms on the cold concrete in the first place.
Structural prep
Older homes add one more variable. If the layout you want requires removing or opening a load-bearing wall, that assessment and the framing that supports the change belong in the budget alongside moisture work. A load-bearing wall assessment early in planning prevents the most expensive kind of surprise, the structural kind. One honest limit here: if a foundation shows active, ongoing failure, that calls for a structural engineer before any finishing contractor should touch the space.
What a Moisture-Aware Budget Looks Like in Practice
Say a homeowner in a flood-prone Metro East zip code owns a 1970s house with an unfinished basement. They want a finished family room, a small basement bathroom, and eventually a bar for watching Cardinals games. The basement smells musty in July, and there was standing water once, three years ago, after a week of storms.
In that illustrative scenario, the budget conversation should cover, in this order:
- Diagnosis: where the moisture enters, how often, and how severe.
- Exterior fixes: gutter and downspout corrections, grading, and sealing visible wall cracks.
- Interior protection: sump pump condition, drainage, and dehumidification.
- Subfloor system: a plywood subfloor over the slab to protect the finished floor.
- Wall assembly: air-impermeable insulation against the concrete, no interior plastic.
- Bathroom rough-in: drain location, venting, and whether the slab needs cutting.
- Finish choices: flooring, drywall, trim, bar construction, and heating for year-round comfort.
As a purely illustrative range, a project like this often lands in five figures, with the moisture and subfloor work claiming a meaningful share before any drywall goes up. The exact split depends on the house, which is why a contractor should walk the basement and itemize the scope rather than quote a cost per square foot over the phone. Any generic per-square-foot number you find online assumes a dry basement, and in this region that assumption is often wrong.
Electrical work in a damp environment carries its own rules worth knowing when you review a quote. Non-metallic sheathed cable, the Romex most homeowners recognize, is against code when run inside EMT conduit in damp or wet locations, according to the National Electrical Code (NFPA 70). When metal EMT conduit is rigidly and continuously connected back to the panel, the conduit itself can serve as the circuit's grounding path without a separate ground wire pulled through it, according to NEMA. You do not need to memorize code. You do need a contractor who treats a basement as a potentially damp location, because the inspector will.
Hidden Moisture Costs That Surprise St. Louis Homeowners
The line items below rarely appear in national cost articles, yet they show up on real St. Louis projects. Knowing them in advance is the difference between a budget and a guess.
Permit and inspection sequencing
Do I need a permit to finish my basement? In St. Louis and surrounding municipalities, finishing a basement with new framing, electrical, or plumbing generally requires permits, and the work gets inspected in stages. Expect an electrical rough-in inspection early, followed later by an insulation inspection before drywall. Permit costs vary by municipality and project scope, so build them into the plan rather than treating them as an afterthought. Unpermitted basement work can also complicate a future home sale, which erases the savings.
Slab condition
Concrete itself can hide problems. Blisters in cured concrete come from trapped air, often caused by floating the surface too soon or by a vapor barrier below preventing water from absorbing into the subgrade, according to NRMCA. A slab with blistering, spalling, or significant cracking may need repair before a subfloor goes down, and that is better discovered during the estimate than during installation.
Bathroom plumbing below grade
Adding a basement bathroom usually means breaking into the slab for drain lines or adding a sewage ejector system if the main drain exits above basement floor level. Either path adds cost, and a past moisture problem can complicate the trenching. This is the single scope item that most often separates a modest finish budget from a larger one.
Tear-out of previous work
If a prior owner finished part of the basement over an unresolved moisture problem, removing that work and correcting what is behind it adds a demolition line to the budget. It is frustrating to pay to remove someone else's shortcuts, but it is cheaper than inheriting them.
Is the Moisture Work Worth It for a Space You Want to Show Off?
For the homeowner who wants a basement worth showing off, the moisture work is what makes the showpiece last. A basement bar, a media wall, and a finished bathroom all sit on the same slab and inside the same walls as a basic rec room. The difference between a basement that still looks sharp in year ten and one that smells like a locker room in year three is almost entirely in the prep work nobody photographs.
There is also an honest trade-off to name. Basements generally return less of their cost at resale than kitchens or main-floor work, unless the renovation is done thoroughly and at a quality level buyers notice. A half-finished basement over a damp slab adds little value and can scare off an inspector. A properly built one, with documented moisture control, a real subfloor, permitted electrical and plumbing, and finishes people want to use, becomes genuine living space that changes how the whole house functions.
That is also the strongest argument against treating moisture work as an optional add-on. Everything aspirational about the project, the bar top, the beverage fridge, the big screen, the guest bathroom, depends on the boring layers underneath staying dry. When you evaluate basement finishing cost, moisture control is not a competing expense against the fun stuff. It is the foundation the fun stuff stands on.
Questions to Ask Before You Sign Anything
A contractor's answers about moisture reveal more than their portfolio does. Before committing, ask these and listen for specifics rather than reassurance:
- Where is moisture entering this basement, and how do you know?
- What happens to your proposed wall assembly if the wall behind it gets damp?
- Do you install a subfloor system, and why or why not for my slab?
- Are you placing a vapor barrier on the interior stud walls? (The right answer is no.)
- Which permits does this project need, and who pulls them?
- How is the bathroom drain being handled, slab cut or ejector pit?
- What in this quote covers the possibility that we open a wall and find water damage?
A contractor who can answer those questions in plain language, with reasons tied to your specific basement, is giving you a real basement finishing cost instead of a hopeful one. In a region where the soil, the storms, and the water table all conspire against dry basements, that clarity is worth more than the lowest bid.
If you need basement finishing, STL Basement Finishing can help.
Prefer to talk it through? Call (314) 916-6297 — a quick call is usually the fastest way to get a straight answer for your situation.