Schluter Ditra-Heat in a Basement Floor: An Installation Guide for St. Louis Homes
A finished basement with cold tile is a finished basement nobody uses. If your basement remodeling plan includes a tiled bathroom or bar area, Schluter Ditra-Heat is one of the most reliable ways to make that floor comfortable, because it combines an uncoupling membrane with electric heating cable in a single assembly built for tile. This guide walks through the installation step by step, in the order a contractor would actually do the work on a St. Louis basement slab, including the permit and moisture questions that matter before anyone opens a box of membrane.
One thing up front: this is an implementation guide, not a comparison piece. If you are still weighing radiant floor heat against extending ductwork or adding a heat pump for basement use, settle that decision first. Ditra-Heat is floor warming for tiled areas. It makes a basement bathroom floor comfortable underfoot; it is not designed to be the sole heat source for a large open rec room.
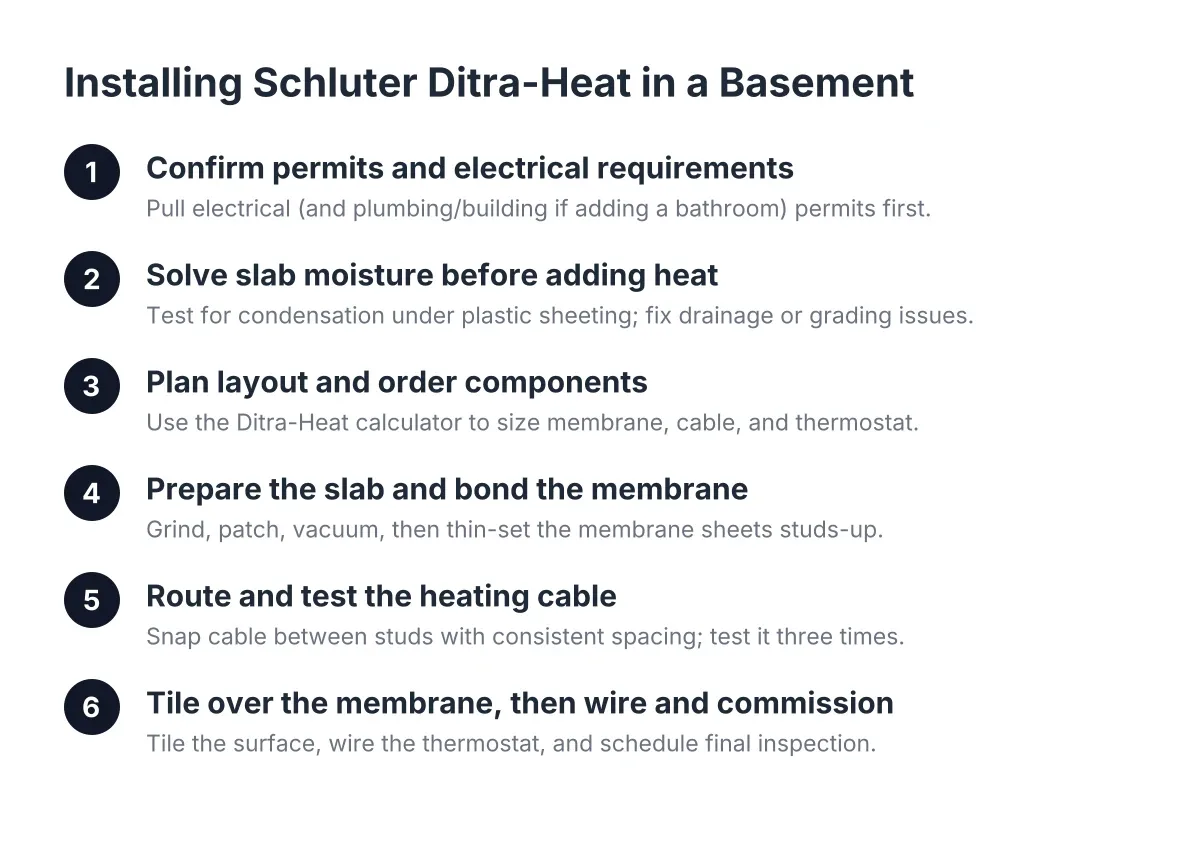
Step 1: Confirm the Permit and Electrical Requirements First
Before any material shows up, sort out permits. In St. Louis, a basement finish that adds a heated floor involves an electrical permit for the new dedicated circuit, and if the heated floor is part of a basement bathroom addition, plumbing and building permits come into play as well. The exact requirements differ between the City of St. Louis and St. Louis County, so confirm with the jurisdiction your home actually sits in rather than relying on a forum post.
If you are the homeowner who worries about doing this the legal way, that instinct is correct here. An unpermitted electric floor heating circuit is exactly the kind of thing a buyer's inspector flags at resale. A good local contractor pulls the permits, schedules the rough-in electrical inspection, and hands you the paperwork; if a contractor tells you a heated floor circuit does not need a permit, treat that as a warning sign, not a convenience.
The electrical side is not optional DIY territory for most people. The heating cable needs a dedicated circuit with GFCI protection, sized to the wattage of the cable you install. Hire a licensed electrician for the circuit and the thermostat connection even if you plan to lay the membrane and tile yourself. That split, homeowner does the tile, electrician does the wiring, is common and it passes inspection cleanly.
Step 2: Solve the Slab Moisture Problem Before the Heat
Heated tile over a damp slab is money buried in a problem. Many older St. Louis and Metro East homes, especially in flood-prone areas, have slabs with no vapor barrier underneath or a history of water intrusion. A vapor barrier under a concrete slab exists to block moisture transmission from the ground into the concrete above, according to W. R. Meadows, and plenty of basements built decades ago never got one.
So test before you build. Tape a square of plastic sheeting to the slab for 24 to 48 hours; condensation underneath means the slab is transmitting moisture. Address the root cause first: grading, gutters, drainage, or a sump system depending on what the water is doing. For a slab with ongoing dampness or unevenness, a dimple mat designed for floor use can decouple the finished floor from the slab and let vapor pressure equalize, though that changes the floor assembly and is a conversation to have with your contractor before committing to tile.
The membrane in the Schluter Ditra-Heat system does provide uncoupling and some vapor management over concrete, which is one reason it suits basements better than heating cable stapled to a wood subfloor. However, it is not a fix for active water intrusion. No floor system is.
Step 3: Plan the Layout and Order the Right Schluter Ditra-Heat Components
Measure the room and mark what will never be heated: under the vanity, under the tub, under the bar cabinets, and the required clearance from walls and fixtures. Heating cable only goes in open floor area you will stand on. In a typical basement bathroom, the heated zone is often half to two thirds of the total square footage.
Use the Schluter Ditra-Heat calculator on the manufacturer's site to size the cable to your actual heated area. Cable cannot be cut to length, so the layout has to match the cable you buy. The core components are:
- The Ditra-Heat uncoupling membrane, in sheets or rolls, with studs that hold the cable without clips or fasteners
- The Ditra-Heat-E-HK heating cable, sized by voltage and heated square footage
- A thermostat, such as the Ditra-Heat-E-RS1 smart thermostat, with a floor sensor
- Unmodified thin-set mortar for the membrane and the tile, per the current installation handbook
Consider the Ditra-Heat-Duo membrane for a basement slab. It adds a thermal break beneath the cable, so the heat drives up into the tile instead of bleeding into cold concrete. On an uninsulated St. Louis slab, that difference shows up in warm-up time and in the cost to run the system every month.
Step 4: Prepare the Slab and Bond the Membrane
The slab needs to be clean, sound, and reasonably flat. Grind high spots and fill low spots with an appropriate patching compound; the membrane telegraphs slab irregularities into the tile if you skip this. Vacuum thoroughly. Thin-set will not bond to dust.
Next, dry-fit the membrane sheets across the room and cut them to fit around the toilet flange, floor drain, and doorway. Then bond them one at a time: comb thin-set onto the slab with the recommended trowel, set the sheet studs-up, and press it in with a float or roller until it is fully embedded. Work in sections you can reach without kneeling on fresh mortar.
Step 5: Route the Heating Cable and Test It Three Times
Snap the cable between the membrane studs following your layout, keeping the spacing consistent, and never crossing or overlapping the cable. Keep the factory splice, the joint between the cold lead and the heating cable, embedded in the floor, and run the cold lead up the wall to the thermostat box. Place the floor sensor between two cable runs, not touching either.
Test the cable resistance with a multimeter and record the reading at three points: before installation, after the cable is routed in the membrane, and after tile is set. Compare each reading to the tag on the cable. This is the single habit that separates a clean job from a nightmare, because a damaged cable found before tile costs minutes and one found after tile costs a demolished floor. Your electrician or inspector may want to see these readings, so write them down.
Step 6: Tile Over the Ditra-Heat Membrane
Fill the membrane cavities and set the tile in one operation, using unmodified thin-set worked firmly over the cable and studs, then combed for the tile. Take care near the cable; a trowel edge is the most common cause of cable damage at this stage. Larger-format tile, 12 by 12 inches and up, sits better over the studded membrane than small mosaics.
Grout, install transitions at the doorway, and let the mortar cure fully before energizing the system. Turning the heat on early to speed curing is a known way to weaken the bond.
Step 7: Wire the Thermostat, Inspect, and Commission
The electrician connects the cold leads and floor sensor to the thermostat on the dedicated GFCI-protected circuit, and the final electrical inspection gets signed off. This closes the permit loop, which is what protects you when a future buyer's agent asks whether the basement finish was permitted. Keep the inspection records with your house documents.
Then program the thermostat. A programmable unit like the Ditra-Heat-E-RS1 lets the floor warm before the morning shower and idle the rest of the day, which is where most of the operating savings live. For context, this floor warming layer usually works alongside the home's broader basement heating systems, extended ductwork or a ductless head handling the air while the tile handles your feet. Some homeowners in older homes pair it with hydronic radiant heating or a radiant heat panel elsewhere in the basement; those are separate systems with separate installs.
How Schluter Ditra-Heat Fits in a Full Basement Finishing Scope
Sequence matters when the heated bathroom is one piece of a larger basement finishing project. Suppose a homeowner in south St. Louis County is finishing 700 square feet with a bathroom and a small basement bar. In that scenario, the moisture work and any subfloor system come first, framing and rough plumbing and electrical follow, inspections happen at rough-in, and the Ditra-Heat membrane and tile go in during the finish phase, after drywall but before fixtures. Getting that order wrong means tearing out finished work to pass an inspection.
Budget-wise, the Schluter Ditra-Heat installation cost depends on heated square footage, whether you choose the Duo membrane, the length of the electrical run back to the panel, and local permit and inspection requirements, rather than one flat number. In a small basement bathroom, the heated floor is usually a modest line item inside the larger bathroom addition, not the item that drives the project cost.
One honest limitation: if your slab shows signs of ongoing water intrusion, heaving, or cracking with displacement, stop and bring in a professional before any floor heating discussion. A heated tile floor is a finish decision. Water and structure are foundation decisions, and they always come first.
If you need basement finishing, STL Basement Finishing can help.
Prefer to talk it through? Call (314) 916-6297 — a quick call is usually the fastest way to get a straight answer for your situation.